Variables:

Variables are containers for storing data values. In Java, there are different types of variables, for example:
  • String – stores text, such as “Hello”. String values are surrounded by double quotes
  • int – stores integers (whole numbers), without decimals, such as 123 or -123
  • float – stores floating point numbers, with decimals, such as 19.99 or -19.99
  • char – stores single characters, such as ‘a’ or ‘B’. Char values are surrounded by single quotes
  • boolean – stores values with two states: true or false

Declaring (Creating) Variables

To create a variable, you must specify the type and assign it a value:
type variableName = value;
Where type is one of Java’s types (such as int or String), and variableName is the name of the variable (such as x or name). The equal sign is used to assign values to the variable. To create a variable that should store text, look at the following example: Create a variable called name of type String and assign it the value “John“. Then we use println() to print the name variable:
String name = "John";
System.out.println(name);

Final Variables

If you don’t want others (or yourself) to overwrite existing values, use the final keyword (this will declare the variable as “final” or “constant”, which means unchangeable and read-only):
final int myNum = 15;
myNum = 20;  // will generate an error: cannot assign a value to a final variable
Other Types A demonstration of how to declare variables of other types:
int myNum = 5;
float myFloatNum = 5.99f;
char myLetter = 'D';
boolean myBool = true;
String myText = "Hello";

Data Types

Java is a statically typed language, meaning every variable must be declared with a specific data type before use. Data types specify the type of data that variables can hold.

Java has two main categories of data types:

  1. Primitive Data Types (Built-in, simple types)
  2. Non-Primitive Data Types (Reference types, including objects, arrays, etc.)

Primitive Data Types

A primitive data type specifies the type of a variable and the kind of values it can hold. There are eight primitive data types in Java:
Data Type Description
byte Stores whole numbers from -128 to 127
short Stores whole numbers from -32,768 to 32,767
int Stores whole numbers from -2,147,483,648 to 2,147,483,647
long Stores whole numbers from -9,223,372,036,854,775,808 to 9,223,372,036,854,775,807
float Stores fractional numbers. Sufficient for storing 6 to 7 decimal digits
double Stores fractional numbers. Sufficient for storing 15 to 16 decimal digits
boolean Stores true or false values
char Stores a single character/letter or ASCII values

Operators

Operators are used to perform operations on variables and values. In the example below, we use the + operator to add together two values:
int x = 100 + 50;
Although the + operator is often used to add together two values, like in the example above, it can also be used to add together a variable and a value, or a variable and another variable:

Example

int sum1 = 100 + 50;        // 150 (100 + 50)
int sum2 = sum1 + 250;      // 400 (150 + 250)
int sum3 = sum2 + sum2;     // 800 (400 + 400)
Java divides the operators into the following groups:
  • Arithmetic operators
  • Assignment operators
  • Comparison operators
  • Logical operators
  • Bitwise operators

Arithmetic Operators

Arithmetic operators are used to perform common mathematical operations.
Operator Name Description Example
+ Addition Adds together two values x + y
Subtraction Subtracts one value from another x – y
* Multiplication Multiplies two values x * y
/ Division Divides one value by another x / y
% Modulus Returns the division remainder x % y
++ Increment Increases the value of a variable by 1 ++x
Decrement Decreases the value of a variable by 1 –x

Java Assignment Operators

Assignment operators are used to assign values to variables. In the example below, we use the assignment operator (=) to assign the value 10 to a variable called x:

Example

int x = 10;

Java Comparison Operators

Comparison operators are used to compare two values (or variables). This is important in programming, because it helps us to find answers and make decisions. The return value of a comparison is either true or false. These values are known as Boolean values, and you will learn more about them in the and If..Else chapter. In the following example, we use the greater than operator (>) to find out if 5 is greater than 3:

Example

int x = 5;
int y = 3;
System.out.println(x > y); // returns true, because 5 is higher than 3

Control Statements (if-else, switch)

The if…else statement in Java is used for decision-making. It allows the program to execute different blocks of code based on conditions. You already know that Java supports the usual logical conditions from mathematics:
  • Less than: a < b
  • Less than or equal to: a <= b
  • Greater than: a > b
  • Greater than or equal to: a >= b
  • Equal to a == b
  • Not Equal to: a != b
You can use these conditions to perform different actions for different decisions. Java has the following conditional statements:
  • Use if to specify a block of code to be executed, if a specified condition is true
  • Use else to specify a block of code to be executed, if the same condition is false
  • Use else if to specify a new condition to test, if the first condition is false
  • Use switch to specify many alternative blocks of code to be executed

The if Statement

Use the if statement to specify a block of Java code to be executed if a condition is true.
if (condition) {
  // block of code to be executed if the condition is true
}
In the example below, we test two values to find out if 20 is greater than 18. If the condition is true, print some text:

Example

if (20 > 18) {
  System.out.println("20 is greater than 18");
}
We can also test variables:

Example

int x = 20;
int y = 18;
if (x > y) {
  System.out.println("x is greater than y");
}
  • The if…else statement helps control program flow.
  • Use nested if for complex conditions.
  • The ternary operator is useful for simple decisions.
The switch statement in Java is used to execute one block of code among multiple options based on a variable’s value. It is a cleaner alternative to multiple if...else if...else statements when dealing with a fixed number of choices.

Syntax

switch(expression) {
  case x:
    // code block
    break;
  case y:
    // code block
    break;
  default:
    // code block
}
This is how it works:
  • The switch expression is evaluated once.
  • The value of the expression is compared with the values of each case.
  • If there is a match, the associated block of code is executed.
  • The break and default keywords are optional, and will be described later in this chapter
The example below uses the weekday number to calculate the weekday name:

Example

int day = 4;
switch (day) {
  case 1:
    System.out.println("Monday");
    break;
  case 2:
    System.out.println("Tuesday");
    break;
  case 3:
    System.out.println("Wednesday");
    break;
  case 4:
    System.out.println("Thursday");
    break;
  case 5:
    System.out.println("Friday");
    break;
  case 6:
    System.out.println("Saturday");
    break;
  case 7:
    System.out.println("Sunday");
    break;
}
// Outputs "Thursday" (day 4)

The break Keyword

When Java reaches a break keyword, it breaks out of the switch block. This will stop the execution of more code and case testing inside the block. When a match is found, and the job is done, it’s time for a break. There is no need for more testing.
A break can save a lot of execution time because it “ignores” the execution of all the rest of the code in the switch block.

The default Keyword

The default keyword specifies some code to run if there is no case match:

Example

int day = 4;
switch (day) {
  case 6:
    System.out.println("Today is Saturday");
    break;
  case 7:
    System.out.println("Today is Sunday");
    break;
  default:
    System.out.println("Looking forward to the Weekend");
}
// Outputs "Looking forward to the Weekend"

Loops (for, while, do-while)

The while loop in Java executes a block of code repeatedly as long as the condition is true. It is used when the number of iterations is not known beforehand. The while loop loops through a block of code as long as a specified condition is true:
while (condition) {
  // code block to be executed
}
In the example below, the code in the loop will run, over and over again, as long as a variable (i) is less than 5:

Example

int i = 0;
while (i < 5) {
  System.out.println(i);
  i++;
}
  • The loop checks the condition before executing the code.
  • If the condition is true, the loop executes.
  • The loop continues running until the condition becomes false.
  • If the condition is false from the beginning, the loop never runs.
  • The while loop executes as long as the condition is true.
  • Use break to exit early and continue to skip an iteration.
  • The do-while loop ensures at least one execution.

The for loop in Java is used when the number of iterations is known. It is widely used for looping through numbers, arrays, and collections efficiently.

for (statement 1; statement 2; statement 3) {
  // code block to be executed
}
Statement 1 is executed (one time) before the execution of the code block. Statement 2 defines the condition for executing the code block. Statement 3 is executed (every time) after the code block has been executed. The example below will print the numbers 0 to 4:

Example

for (int i = 0; i < 5; i++) {
  System.out.println(i);
}

Example explained

Statement 1 sets a variable before the loop starts (int i = 0). Statement 2 defines the condition for the loop to run (i must be less than 5). If the condition is true, the loop will start over again, if it is false, the loop will end. Statement 3 increases a value (i++) each time the code block in the loop has been executed.

Another Example

This example will only print even values between 0 and 10:

Example

for (int i = 0; i <= 10; i = i + 2) {
  System.out.println(i);
}
  • The for loop executes a block of code a fixed number of times.
  • Use break to stop a loop and continue to skip an iteration.
  • The for-each loop is best for iterating over arrays and collections.

Methods and Functions

Java Methods are blocks of code that perform a specific task. A method allows us to reuse code, improving both efficiency and organization. All methods in Java must belong to a class. Methods are similar to functions and expose the behavior of objects.

Example:

// Creating a method
// that prints a message
public class Method {
  
    // Method to print message
    public void printMessage() {
        System.out.println("Hello!");
    }

    public static void main(String[] args) {
      
        // Create an instance of the Method class
        Method m = new Method();
        m.printMessage();  // Calling the method
    }
}

Output

Hello!

Explanation: In this example, printMessage() is a simple method that prints a message. It has no parameters and does not return anything.

Syntax of a Method

<access_modifier> <return_type> <method_name>( list_of_parameters) { //body }

Key Components of a Method Declaration

  • Modifier: It specifies the method’s access level (e.g., public, private, protected, or default).
  • Return Type: The type of value returned, or void if no value is returned.
  • Method Name: It follows Java naming conventions; it should start with a lowercase verb and use camel case for multiple words.
  • Parameters: A list of input values (optional). Empty parentheses are used if no parameters are needed.
  • Exception List: The exceptions the method might throw (optional).
  • Method Body: It contains the logic to be executed (optional in the case of abstract methods).
Method Body in Java

Components of a method

Types of Methods in Java

1. Predefined Method

Predefined methods are the method that is already defined in the Java class libraries. It is also known as the standard library method or built-in method.

Example:

Math.random() // returns random value

Math.PI() // return pi value

2. User-defined Method

The method written by the user or programmer is known as a user-defined method. These methods are modified according to the requirement.

Example:

sayHello // user define method created above in the article

Testmethod()

setName()

Different Ways to Create Java Method

There are two ways to create a method in Java:

1. Instance MethodAccess the instance data using the object name. Declared inside a class.

Example:

// Instance Method

void method_name() {

// instance method body

}

2. Static MethodAccess the static data using class name. Declared inside class withstatic keyword.

Example:

// Static Method

static void method_name() {

// static method body

}

Method Signature

It consists of the method name and a parameter list.

  • number of parameters
  • type of the parameters
  • order of the parameters

Note: The return type and exceptions are not considered as part of it.

Method Signature of the above function:

max(int x, int y) Number of parameters is 2, Type of parameter is int.

Naming a Method

In Java language method name is typically a single word that should be a verb in lowercase or a multi-word, that begins with a verb in lowercase followed by an adjective, noun. After the first word, the first letter of each word should be capitalized.

Rules to Name a Method:

  • While defining a method, remember that the method name must be a verb and start with a lowercase letter.
  • If the method name has more than two words, the first name must be a verb followed by an adjective or noun.
  • In the multi-word method name, the first letter of each word must be in uppercase except the first word. For example, findSum, computeMax, setX, and getX.

Generally, a method has a unique name within the class in which it is defined but sometimes a method might have the same name as other method names within the same class as method overloading is allowed in Java.

Method Calling

Method calling allows to reuse code and organize our program effectively. The method needs to be called for use its functionality. There can be three situations when a method is called: A method returns to the code that invoked it when:

  • It completes all the statements in the method.
  • It reaches a return statement.
  • Throws an exception.

Example 1: Method calling using object

class Add {
    int s = 0;
    public int addTwoInt(int a, int b) {
        s = a + b;
        return s;
    }
}

class Main {
    public static void main(String[] args) {
        Add a = new Add();
        int res = a.addTwoInt(1, 2);
        System.out.println("Sum: " + res);  
    }
}

Output

Sum: 3

Example 2: Calling Methods in Different Ways

// Java Program to Illustrate Method Calling
import java.io.*;

// Helper class
class Test {

    public static int i = 0;

    // Constructor to count objects
    Test() {
        i++;
    }

    // Static method to get the 
    // number of objects created
    public static int get() {
        return i;
    }

    // Instance method m1 calling 
    // another method m2
    public int m1() {
        System.out.println("Inside the method m1");
        this.m2();  // Calling m2 method
        return 1;
    }

    // Method m2 that prints a message
    public void m2() {
        System.out.println("In method m2");
    }
}

// Main class
class Testmethod{

    // Main driver method
    public static void main(String[] args) {

        // Creating object of Test class
        Test obj = new Test();

        // Calling m1 method
        int i = obj.m1();
        System.out.println("Control returned after m1: " + i);

        // Get and print the number of objects created
        int o = Test.get();
        System.out.println("No of instances created: " + o);
    }
}

Output

Inside the method m1
In method m2
Control returned after m1: 1
No of instances created: 1

The control flow of the above program is as follows:

Control Flow diagram of the Program

Passing Parameters to a Method

There are some cases when we don’t know the number of parameters to be passed or an unexpected case to use more parameters than declared number of parameters. In such cases we can use

  • Passing Array as an Argument
  • Passing Variable-arguments as an Argument
  • Method Overloading.

Memory Allocation for Methods Calls

Methods calls are implemented through a stack. Whenever a method is called a stack frame is created within the stack area and after that, the arguments passed to and the local variables and value to be returned by this called method are stored in this stack frame and when execution of the called method is finished, the allocated stack frame would be deleted. There is a stack pointer register that tracks the top of the stack which is adjusted accordingly.

Example: Accessor and Mutator Methods

public class Testmethod{
    private int num;
    private String n;

    // Accessor (getter) methods
    public int getNumber() { 
      return num; 
    }
    public String getName() { 
      return n; 
    }

    // Mutator (setter) methods
    public void setNumber(int num) { 
      this.num = num; 
    }
    public void setName(String n) { 
      this.n = n; 
    }

    // Other methods
    public void printDetails() {
        System.out.println("Number: " + num);
        System.out.println("Name: " + n);
    }

    // Main method to run the code
    public static void main(String[] args) {
        Testmethod g = new Testmethod();
        g.setNumber(123);   // Set the number
        g.setName("GFG Write");   // Set the name
        g.printDetails();  
    }
}

Output

Number: 123
Name: GFG Write

Explanation: In the above example, the Testmethod class contains private fields num and n, with getter and setter method to access and modify their values. The printDetails() method prints the values of num and n to the console. In the main method, the setNumbersetName, and printDetails methods are called to set and display the object’s details.

Advantages of Methods

  • Reusability: Methods allow us to write code once and use it many times.
  • Abstraction: Methods allow us to abstract away complex logic and provide a simple interface for others to use.
  • Encapsulation: Allow to encapsulate complex logic and data
  • Modularity: Methods allow us to break up your code into smaller, more manageable units, improving the modularity of your code.
  • Customization: Easy to customize for specific tasks.
  • Improved performance: By organizing your code into well-structured methods, you can improve performance by reducing the amount of code.
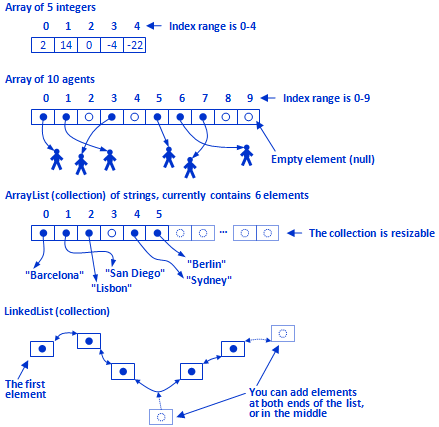
Java offers two types of constructs where you can store multiple values or objects of the same type: arrays and collections (for System Dynamics models AnyLogic also offers HyperArray, also known as “subscripts”, — a special type of collection for dynamic variables).

Arrays and Collections

Array or Collection? Arrays are simple constructs with linear storage of fixed size, and therefore they can only hold a given number of elements. Arrays are built into the core of the Java language, and array-related Java syntax is very simple and straightforward, for example, the nth element of the array can be obtained as array[n-1]. Collections are more complex and flexible. First of all, they are resizable: you can add any number of elements to a collection. A collection will automatically handle deleting an element from any position. There are several types of collections with different internal storage structure (linear, list, hash set, tree, and so on) and you can choose a collection type that best suits your problem so that your most common operations will be convenient and efficient. Collections are Java classes and the syntax for getting, for example, the n-th element of a collection of type ArrayList is collection.get(n). Java arrays and collections
Indices in Java arrays and collections start with 0, not 1! In an array or collection of size 10, the index of the first element is 0, and the index of the last element is 9.

Classes and Objects

In Java, classes and objects are basic concepts of Object Oriented Programming (OOPs) that are used to represent real-world concepts and entities. The class represents a group of objects having similar properties and behavior. For example, the animal type Dog is a class while a particular dog named Tommy is an object of the Dog class. In this article, we will discuss Java classes and objects and how to implement them in our program.

Difference Between Java Classes and Objects

The main differences between class and object in Java are as follows:

Class

Object

Class is the blueprint of an object. It is used to create objects.An object is an instance of the class.
No memory is allocated when a class is declared.Memory is allocated as soon as an object is created.
A class is a group of similar objects.An object is a real-world entity such as a book, car, etc.
Class is a logical entity.An object is a physical entity.
A class can only be declared once.Objects can be created many times as per requirement.
An example of class can be a car.Objects of the class car can be BMW, Mercedes, Ferrari, etc.

Java Classes

class in Java is a set of objects which shares common characteristics and common properties. It is a user-defined blueprint or prototype from which objects are created. For example, Student is a class while a particular student named Ravi is an object.

Properties of Java Classes

  • Class is not a real-world entity. It is just a template or blueprint or prototype from which objects are created.
  • Class does not occupy memory.
  • Class is a group of variables of different data types and a group of methods.
  • A Class in Java can contain:
    • Data member
    • Method
    • Constructor
    • Nested Class
    • Interface

Class Declaration in Java

access_modifier class <class_name>

{

data member;

method;

constructor;

nested class;

interface;

}

Components of Java Classes

In general, class declarations can include these components, in order:

  • Modifiers: A class can be public or has default access.
  • Class keyword: Class keyword is used to create a class.
  • Class name: The name should begin with an initial letter (capitalized by convention).
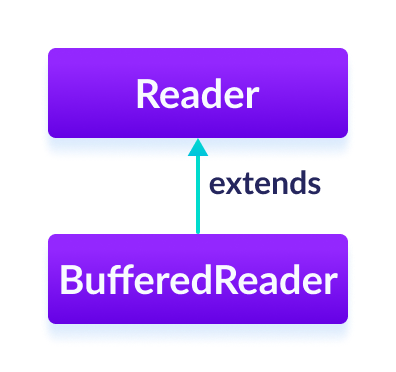
  • Superclass (if any): The name of the class’s parent (superclass), if any, preceded by the keyword extends. A class can only extend (subclass) one parent.
  • Interfaces(if any): A comma-separated list of interfaces implemented by the class, if any, preceded by the keyword implements. A class can implement more than one interface.
  • Body: The class body is surrounded by braces, { }.

Constructors are used for initializing new objects. Fields are variables that provide the state of the class and its objects, and methods are used to implement the behavior of the class and its objects. There are various types of classes that are used in real-time applications such as nested classes, anonymous classes and lambda expressions.

Example 1: Here, the below Java code demonstrates the basic use of class in Java.

// Java Class example
class Student {
  
    // data member (also instance variable)
    int id;
  
    // data member (also instance variable)
    String n;
  
    public static void main(String args[]) {
      
        // creating an object of
        // Student
        Student s1 = new Student();
        System.out.println(s1.id);
        System.out.println(s1.n);
    }
}
 

Output

0
null

Example 2: Here, the below Java code demonstrates creating an object using the newInstance() method.


// Creation of Object
// Using new Instance
class Geeks {

    // Declaring and initializing string
    String n = "GeeksForGeeks";

    // Main driver method
    public static void main(String[] args) {
      
        // Try block to check for exceptions
        try {
            // Correcting the class name to match "Geeks"
            Class<?> c = Class.forName("Geeks");
          
            // Creating an object of the main class using reflection
            Geeks o = (Geeks) c.getDeclaredConstructor().newInstance();
          
            // Print and display
            System.out.println(o.n);
        }
        catch (ClassNotFoundException e) {
            e.printStackTrace();
        }
        catch (InstantiationException e) {
            e.printStackTrace();
        }
        catch (IllegalAccessException e) {
            e.printStackTrace();
        }
        catch (NoSuchMethodException e) {
            e.printStackTrace();
        }
        catch (Exception e) {
            e.printStackTrace();
        }
    }
}
 

Output

GeeksForGeeks

Java Objects

An object in Java is a basic unit of Object-Oriented Programming and represents real-life entities. Objects are the instances of a class that are created to use the attributes and methods of a class. A typical Java program creates many objects, which as you know, interact by invoking methods. An object consists of:

  • State: It is represented by attributes of an object. It also reflects the properties of an object.
  • Behavior: It is represented by the methods of an object. It also reflects the response of an object with other objects.
  • Identity: It gives a unique name to an object and enables one object to interact with other objects.

Example of an object: Dog

Objects in Java

Java Objects

Objects correspond to things found in the real world. For example, a graphics program may have objects such as “circle”, “square”, and “menu”. An online shopping system might have objects such as “shopping cart”, “customer”, and “product”.

Note: When we create an object which is a non primitive data type, it’s always allocated on the heap memory.

Declaring Objects (Also called instantiating a Class)

When an object of a class is created, the class is said to be instantiated. All the instances share the attributes and the behavior of the class. But the values of those attributes, i.e. the state are unique for each object. A single class may have any number of instances.

Example:

Declaring Objects in Java

Java Object Declaration

As we declare variables like (type name;). This notifies the compiler that we will use the name to refer to data whose type is type. With a primitive variable, this declaration also reserves the proper amount of memory for the variable. So for reference variables , the type must be strictly a concrete class name. In general, we can’t create objects of an abstract class or an interface.

Dog tuffy;

If we declare a reference variable(tuffy) like this, its value will be undetermined(null) until an object is actually created and assigned to it. Simply declaring a reference variable does not create an object.

Initializing a Java Object

The new operator instantiates a class by allocating memory for a new object and returning a reference to that memory. The new operator also invokes the class constructor.

Example:

// Java Program to Demonstrate the 
// use of a class with instance variable 

// Class Declaration
public class Dog {
  
    // Instance Variables
    String name;
    String breed;
    int age;
    String color;

    // Constructor Declaration of Class
    public Dog(String name, String breed, int age,
               String color)
    {
        this.name = name;
        this.breed = breed;
        this.age = age;
        this.color = color;
    }

    // method 1
    public String getName() { 
      return name; 
    }

    // method 2
    public String getBreed() { 
      return breed; 
    }

    // method 3
    public int getAge() { 
      return age; 
    }

    // method 4
    public String getColor() { 
      return color; 
    }

    @Override public String toString()
    {
        return ("Name is: " + this.getName()
                + "\nBreed, age, and color are: "
                + this.getBreed() + "," + this.getAge()
                + "," + this.getColor());
    }

    public static void main(String[] args)
    {
        Dog tuffy
            = new Dog("tuffy", "papillon", 5, "white");
        System.out.println(tuffy.toString());
    }
}
 

Output

Name is: tuffy
Breed, age, and color are: papillon,5,white

Explanation: Here, the above program demonstrate a class Dog with some instance variables. The constructor is used to initializes value to these variables. The toString() method is used to provide a string representation of the dog object. In the main method, a Dog object named tuffy is created with specific values and its details are printed using the toString() method.

This class contains a single constructor. We can recognize a constructor because its declaration uses the same name as the class and it has no return type. The Java compiler differentiates the constructors based on the number and the type of the arguments. The constructor in the Dog class takes four arguments. The following statement provides “tuffy”, “papillon”,5, and “white” as values for those arguments:

Dog tuffy = new Dog(“tuffy”,”papillon”,5, “white”);

The result of executing this statement can be illustrated as :

Memory Allocation in Java objects

Note: All classes have at least one constructor. If a class does not explicitly declare any, the Java compiler automatically provides a no-argument constructor, also called the default constructor. This default constructor calls the class parent’s no-argument constructor (as it contains only one statement i.e super();), or the Object class constructor if the class has no other parent (as the Object class is the parent of all classes either directly or indirectly).

Initialize Object by using Method/Function

// Java Program to initialize Java Object
// by using method/function
public class Geeks {

    static String name;
    static float price;

    static void set(String n, float p) {
        name = n;
        price = p;
    }

    static void get()
    {
        System.out.println("Software name is: " + name);
        System.out.println("Software price is: " + price);
    }

    public static void main(String args[])
    {
        Geeks.set("Visual studio", 0.0f);
        Geeks.get();
    }
}
 

Output

Software name is: Visual studio
Software price is: 0.0

Ways to Create an Object of a Class

There are four ways to create objects in Java. Although the new keyword is the primary way to create an object, the other methods also internally rely on the new keyword to create instances.

1. Using new Keyword

It is the most common and general way to create an object in Java.

Example:

// creating object of class Test

Test t = new Test();

2. Using Class.forName(String className) Method

There is a pre-defined class in java.lang package with name Class. The forName(String className) method returns the Class object associated with the class with the given string name. We have to give a fully qualified name for a class. On calling the new Instance() method on this Class object returns a new instance of the class with the given string name.

// creating object of public class Test

// consider class Test present in com.p1 package

Test obj = (Test)Class.forName(“com.p1.Test”).newInstance();

3. Using clone() method

The clone() method is present in the Object class. It creates and returns a copy of the object.

// creating object of class Test

Test t1 = new Test();

// creating clone of above object

Test t2 = (Test)t1.clone();

Example:

// Creation of Object
// Using clone() method

// Main class
// Implementing Cloneable interface
class Geeks implements Cloneable {

    // Method 1
    @Override
    protected Object clone()
        throws CloneNotSupportedException
    {
        // Super() keyword refers to parent class
        return super.clone();
    }
    String name = "GeeksForGeeks";
  
    // Method 2
    // main driver method
    public static void main(String[] args)
    {
        Geeks o1 = new Geeks();
      
        // Try block to check for exceptions
        try {
            Geeks o2 = (Geeks)o1.clone();
            System.out.println(o2.name);
        }
        catch (CloneNotSupportedException e) {
            e.printStackTrace();
        }
    }
}

Constructors

Java constructors are special types of methods that are used to initialize an object when it is created. It has the same name as its class and is syntactically similar to a method. However, constructors have no explicit return type.

Typically, you will use a constructor to give initial values to the instance variables defined by the class or to perform any other start-up procedures required to create a fully formed object.

All classes have constructors, whether you define one or not because Java automatically provides a default constructor that initializes all member variables to zero. However, once you define your constructor, the default constructor is no longer used.

Rules for Creating Java Constructors

You must follow the below-given rules while creating Java constructors:

  • The name of the constructors must be the same as the class name.
  • Java constructors do not have a return type. Even do not use void as a return type.
  • There can be multiple constructors in the same class, this concept is known as constructor overloading.
  • The access modifiers can be used with the constructors, use if you want to change the visibility/accessibility of constructors.
  • Java provides a default constructor that is invoked during the time of object creation. If you create any type of constructor, the default constructor (provided by Java) is not invoked.

Creating a Java Constructor

To create a constructor in Java, simply write the constructor’s name (that is the same as the class name) followed by the brackets and then write the constructor’s body inside the curly braces ({}).

Syntax

Following is the syntax of a constructor −

class ClassName { ClassName() { } }

Example to create a Java Constructor

The following example creates a simple constructor that will print “Hello world”.

public class Main { // Creating a constructor Main() { System.out.println(“Hello, World!”); } public static void main(String[] args) { System.out.println(“The main() method.”); // Creating a class’s object // that will invoke the constructor Main obj_x = new Main(); } }

This program will print:

The main() method.
Hello, World!

Types of Java Constructors

There are three different types of constructors in Java, we have listed them as follows:

  • Default Constructor
  • No-Args Constructor
  • Parameterized Constructor

Java Constructors

1. Default Constructor

If you do not create any constructor in the class, Java provides a default constructor that initializes the object.

Example: Default Constructor (A Class Without Any Constructor)

In this example, there is no constructor defined by us. The default constructor is there to initialize the object.

public class Main { int num1; int num2; public static void main(String[] args) { // We didn’t created any structure // a default constructor will invoke here Main obj_x = new Main(); // Printing the values System.out.println(“num1 : “ + obj_x.num1); System.out.println(“num2 : “ + obj_x.num2); } }

Output

num1 : 0
num2 : 0

2. No-Args (No Argument) Constructor

As the name specifies, the No-argument constructor does not accept any argument. By using the No-Args constructor you can initialize the class data members and perform various activities that you want on object creation.

Example: No-Args Constructor

This example creates no-args constructor.

public class Main { int num1; int num2; // Creating no-args constructor Main() { num1 = 1; num2 = 1; } public static void main(String[] args) { // no-args constructor will invoke Main obj_x = new Main(); // Printing the values System.out.println(“num1 : “ + obj_x.num1); System.out.println(“num2 : “ + obj_x.num2); } }

Output

num1 : -1
num2 : -1

3. Parameterized Constructor

A constructor with one or more arguments is called a parameterized constructor.

Most often, you will need a constructor that accepts one or more parameters. Parameters are added to a constructor in the same way that they are added to a method, just declare them inside the parentheses after the constructor’s name.

Example 1: Parameterized Constructor

This example creates a parameterized constructor.

public class Main { int num1; int num2; // Creating parameterized constructor Main(int a, int b) { num1 = a; num2 = b; } public static void main(String[] args) { // Creating two objects by passing the values // to initialize the attributes. // parameterized constructor will invoke Main obj_x = new Main(10, 20); Main obj_y = new Main(100, 200); // Printing the objects values System.out.println(“obj_x”); System.out.println(“num1 : “ + obj_x.num1); System.out.println(“num2 : “ + obj_x.num2); System.out.println(“obj_y”); System.out.println(“num1 : “ + obj_y.num1); System.out.println(“num2 : “ + obj_y.num2); } }

Output

obj_x
num1 : 10
num2 : 20
obj_y
num1 : 100
num2 : 200

Example 2: Parameterized Constructor

Here is a simple example that uses a constructor −

// A simple constructor. class MyClass { int x; // Following is the constructor MyClass(int i ) { x = i; } }

You would call constructor to initialize objects as follows −

public class ConsDemo { public static void main(String args[]) { MyClass t1 = new MyClass( 10 ); MyClass t2 = new MyClass( 20 ); System.out.println(t1.x + ” “ + t2.x); } }

Output

10 20

Constructor Overloading in Java

Constructor overloading means multiple constructors in a class. When you have multiple constructors with different parameters listed, then it will be known as constructor overloading.

Example: Constructor Overloading

In this example, we have more than one constructor.

// Example of Java Constructor Overloading // Creating a Student Class class Student { String name; int age; // no-args constructor Student() { this.name = “Unknown”; this.age = 0; } // parameterized constructor having one parameter Student(String name) { this.name = name; this.age = 0; } // parameterized constructor having both parameters Student(String name, int age) { this.name = name; this.age = age; } public void printDetails() { System.out.println(“Name : “ + this.name); System.out.println(“Age : “ + this.age); } } public class Main { public static void main(String[] args) { Student std1 = new Student(); // invokes no-args constructor Student std2 = new Student(“Jordan”); // invokes parameterized constructor Student std3 = new Student(“Paxton”, 25); // invokes parameterized constructor // Printing details System.out.println(“std1…”); std1.printDetails(); System.out.println(“std2…”); std2.printDetails(); System.out.println(“std3…”); std3.printDetails(); } }

Output

td1...
Name : Unknown
Age : 0
std2...
Name : Jordan
Age : 0
std3...
Name : Paxton
Age : 25

Inheritance

Inheritance is an important feature of object-oriented programming in Java. It allows for one class (child class) to inherit the fields and methods of another class (parent class). For instance, we might want a child class Dog to inherent traits from a more general parent class Animal.

When defining a child class in Java, we use the keyword extends to inherit from a parent class.

 
// Parent Class
class Animal {
// Animal class members
}
 
// Child Class
class Dog extends Animal {
// Dog inherits traits from Animal
 
// additional Dog class members
}

Main() method in Java

In simple Java programs, you may work with just one class and one file. However, as your programs become more complex you will work with multiple classes, each of which requires its own file. Only one of these files in the Java package requires a main() method, and this is the file that will be run in the package.

For example, say we have two files in our Java package for two different classes:

  • Shape, the parent class.
  • Square, the child class.

If the Java file containing our Shape class is the only one with a main() method, this is the file that will be run for our Java package.

 
// Shape.java file
class Shape {
public static void main(String[] args) {
Square sq = new Square();
}
}
 
// Square.java file
class Square extends Shape {
 
}

super() in Java

In Java, a child class inherits its parent’s fields and methods, meaning it also inherits the parent’s constructor. Sometimes we may want to modify the constructor, in which case we can use the super() method, which acts like the parent constructor inside the child class constructor.

Alternatively, we can also completely override a parent class constructor by writing a new constructor for the child class.

 
// Parent class
class Animal {
String sound;
Animal(String snd) {
this.sound = snd;
}
}
 
// Child class
class Dog extends Animal {
// super() method can act like the parent constructor inside the child class constructor.
Dog() {
super(“woof”);
}
// alternatively, we can override the constructor completely by defining a new constructor.
Dog() {
this.sound = “woof”;
}
}

Protected and Final keywords in Java

When creating classes in Java, sometimes we may want to control child class access to parent class members. We can use the protected and final keywords to do just that.

protected keeps a parent class member accessible to its child classes, to files within its own package, and by subclasses of this class in another package.

Adding final before a parent class method’s access modifier makes it so that any child classes cannot modify that method – it is immutable.

 
class Student {
protected double gpa;
// any child class of Student can access gpa
 
final protected boolean isStudent() {
return true;
}
// any child class of Student cannot modify isStudent()
}

Polymorphism

Java incorporates the object-oriented programming principle of polymorphism.

Polymorphism allows a child class to share the information and behavior of its parent class while also incorporating its own functionality. This allows for the benefits of simplified syntax and reduced cognitive overload for developers.

 
// Parent class
class Animal {
public void greeting() {
System.out.println(“The animal greets you.”);
}
}
 
// Child class
class Cat extends Animal {
public void greeting() {
System.out.println(“The cat meows.”);
}
}
 
class MainClass {
public static void main(String[] args) {
Animal animal1 = new Animal(); // Animal object
Animal cat1 = new Cat(); // Cat object
animal1.greeting(); // prints “The animal greets you.”
cat1.greeting(); // prints “The cat meows.”
}
}

Method Overriding in Java

In Java, we can easily override parent class methods in a child class. Overriding a method is useful when we want our child class method to have the same name as a parent class method but behave a bit differently.

In order to override a parent class method in a child class, we need to make sure that the child class method has the following in common with its parent class method:

  • Method name
  • Return type
  • Number and type of parameters

Additionally, we should include the @Override keyword above our child class method to indicate to the compiler that we want to override a method in the parent class.

 
// Parent class
class Animal {
public void eating() {
System.out.println(“The animal is eating.”);
}
}
 
// Child class
class Dog extends Animal {
// Dog’s eating method overrides Animal’s eating method
@Override
public void eating() {
System.out.println(“The dog is eating.”);
}
}

Child Classes in Arrays and ArrayLists

In Java, polymorphism allows us to put instances of different classes that share a parent class together in an array or ArrayList.

For example, if we have an Animal parent class with child classes CatDog, and Pig we can set up an array with instances of each animal and then iterate through the list of animals to perform the same action on each.

 
// Animal parent class with child classes Cat, Dog, and Pig.
Animal cat1, dog1, pig1;
 
cat1 = new Cat();
dog1 = new Dog();
pig1 = new Pig();
 
// Set up an array with instances of each animal
Animal[] animals = {cat1, dog1, pig1};
 
// Iterate through the list of animals and perform the same action with each
for (Animal animal : animals) {
 
animal.sound();

Encapsulation

Encapsulation in Java is a fundamental OOP (object-oriented programming) principle that combines data and methods in a class. It allows implementation details to be hidden while exposing a public interface for interaction.

Example: Below is a simple example of Encapsulation in Java.

// Java program demonstrating Encapsulation
class Programmer {
    private String name;

    // Getter and Setter for name
    public String getName() { return name; }
    public void setName(String name) { this.name = name; }
}

public class Geeks {
    public static void main(String[] args) {
        Programmer p = new Programmer();
        p.setName("Geek"); 
        System.out.println("Name=> " + p.getName());
    }
}
 

Output

Name=> Geek

Explanation: In this example, the class restricts direct access to it from outside. The getName() and setName() methods, known as getters and setters, provide controlled access to the name attribute. This encapsulation mechanism protects the internal state of the Programmer object and allows for better control and flexibility in how the name attribute is accessed and modified.

Implementation of Java Encapsulation

In Java, encapsulation is implemented by declaring instance variables as private, restricting direct access. Public getter methods retrieve variable values, while setter methods modify them, enabling controlled access. This approach allows the class to enforce data validation and maintain a consistent internal state, enhancing security and flexibility.

Encapsulation is defined as the wrapping up of data under a single unit. It is the mechanism that binds together code and the data it manipulates. Another way to think about encapsulation is, that it is a protective shield that prevents the data from being accessed by the code outside this shield.

  • In encapsulation, the variables or data of a class are hidden from any other class and can be accessed only through any member function of its own class.
  • A private class can hide its members or methods from the end user, using abstraction to hide implementation details, by combining data hiding and abstraction.
  • Encapsulation can be achieved by Declaring all the variables in the class as private and writing public methods in the class to set and get the values of variables.
  • It is more defined with the setter and getter method.

Example 1: Here is another example of encapsulation in Java

// Java program to demonstrate the Encapsulation.
class Person {
    // Encapsulating the name and age
    // only approachable and used using
    // methods defined
    private String name;
    private int age;

    public String getName() { return name; }

    public void setName(String name) { this.name = name; }

    public int getAge() { return age; }

    public void setAge(int age) { this.age = age; }
}

// Driver Class
public class Geeks {
    // main function
    public static void main(String[] args)
    {
        // person object created
        Person p = new Person();
        p.setName("John");
        p.setAge(30);
        // Using methods to get the values from the
        // variables
        System.out.println("Name: " + p.getName());
        System.out.println("Age: " + p.getAge());
    }
}
 

Output

Name: John
Age: 30

Explanation: Here the encapsulation is achieved by restricting direct access to the name and age fields of the Person class. These fields are marked as private and can only be accessed or modified through public getter and setter methods (getName(), setName(), getAge(), setAge()). This approach ensures data hiding and maintains control over the values of these fields.

Example 2: In this example, we use abstraction to hide the implementation and show the functionality.

class Area {
    private int l; // this value stores length
    private int b; // this value stores breadth

    // constructor to initialize values
    Area(int l, int b)
    {
        this.l = l;
        this.b = b;
    }

    // method to calculate area
    public void getArea()
    {
        int area = l * b;
        System.out.println("Area: " + area);
    }
}

public class Geeks {
    public static void main(String[] args)
    {
        Area rect = new Area(2, 16);
        rect.getArea();
    }
}
 

Output

Area: 32

Example 2: The program to access variables of the class EncapsulateDemo is shown below:

// Java program to demonstrate 
// Java encapsulation

class Encapsulate {
    // private variables declared
    // these can only be accessed by
    // public methods of class
    private String geekName;
    private int geekRoll;
    private int geekAge;

    // get method for age to access
    // private variable geekAge
    public int getAge() { return geekAge; }

    // get method for name to access
    // private variable geekName
    public String getName() { return geekName; }

    // get method for roll to access
    // private variable geekRoll
    public int getRoll() { return geekRoll; }

    // set method for age to access
    // private variable geekage
    public void setAge(int newAge) { geekAge = newAge; }

    // set method for name to access
    // private variable geekName
    public void setName(String newName)
    {
        geekName = newName;
    }

    // set method for roll to access
    // private variable geekRoll
    public void setRoll(int newRoll) { geekRoll = newRoll; }
}

public class TestEncapsulation {
    public static void main(String[] args)
    {
        Encapsulate o = new Encapsulate();

        // setting values of the variables
        o.setName("Harsh");
        o.setAge(19);
        o.setRoll(51);

        // Displaying values of the variables
        System.out.println("Geek's name: " + o.getName());
        System.out.println("Geek's age: " + o.getAge());
        System.out.println("Geek's roll: " + o.getRoll());

        // Direct access of geekRoll is not possible
        // due to encapsulation
        // System.out.println("Geek's roll: " +
        // obj.geekName);
    }
}
 

Output

Geek's name: Harsh
Geek's age: 19
Geek's roll: 51

Explanation: In the above program, the class Encapsulate is encapsulated as the variables are declared private. The get methods like getAge(), getName(), and getRoll() are set as public, these methods are used to access these variables. The setter methods like setName(), setAge(), and setRoll() are also declared as public and are used to set the values of the variables.

Example 4: Below is the implementation of the Java Encapsulation:

// Java Program which demonstrate Encapsulation
class Account {
    // Private data members (encapsulated)
    private long accNo; // Account number 
    private String name;
    private String email;
    private float amount;

    // Public getter and setter methods (controlled access)
    public long getAccNo() { return accNo; }
    public void setAccNo(long accNo) { this.accNo = accNo; }
    public String getName() { return name; }
    public void setName(String name) { this.name = name; }
    public String getEmail() { return email; }
    public void setEmail(String email) { this.email = email; }
    public float getAmount() { return amount; }
    public void setAmount(float amount) { this.amount = amount; }
}

public class Geeks {
    public static void main(String[] args) {
        // Create an Account object
        Account acc = new Account(); 

        // Set values using setter methods (controlled access)
        acc.setAccNo(90482098491L);
        acc.setName("ABC");
        acc.setEmail("abc@gmail.com");
        acc.setAmount(100000f);

        // Get values using getter methods
        System.out.println("Account Number: " + acc.getAccNo());
        System.out.println("Name: " + acc.getName());
        System.out.println("Email: " + acc.getEmail());
        System.out.println("Amount: " + acc.getAmount());
    }
}
 

Output

90482098491 ABC abc@gmail.com 100000.0

Explanation: in the above code we can easily get the values and set the values easily by using the methods. Here the implementation is hidden and we can perform the tasks which makes it easy to use for end users.

Advantages of Encapsulation

  • Data Hiding: Encapsulation provides data hiding. Users don’t see the implementation of the class. The user only knows that we are passing the values to a setter method and variables are getting initialized with that value.
  • Data Integrity: By using getter and setter methods, we can ensure that only valid data is assigned to variables. If we omit the setter methods, we make the variables read-only, and if we omit the getter methods, we make them write-only. This ensures the internal state of the object is protected and maintains data integrity.
  • Reusability: Encapsulation also improves the re-usability and is easy to change with new requirements.
  • Testing code is easy: Encapsulated code is easy to test for unit testing.
  • Freedom of advantages the details: one of the major advantages of encapsulation is that it gives the programmer freedom to implement the details of a system. The only constraint on the programmer is to maintain the abstract interface that outsiders see. 

Disadvantages of Encapsulation in Java

  • It can lead to increased complexity, especially if not used properly.
  • It can make it more difficult to understand how the system works.
  • This may limit the flexibility of the implementation.

Abstraction

Data abstraction is the process of hiding certain details and showing only essential information to the user.
Abstraction can be achieved with either abstract classes or interfaces

The abstract keyword is a non-access modifier, used for classes and methods:

    • Abstract class: is a restricted class that cannot be used to create objects (to access it, it must be inherited from another class).
  • Abstract method: can only be used in an abstract class, and it does not have a body. The body is provided by the subclass (inherited from).

An abstract class can have both abstract and regular methods:

abstract class Animal {
  public abstract void animalSound();
  public void sleep() {
    System.out.println("Zzz");
  }
}

From the example above, it is not possible to create an object of the Animal class:

Animal myObj = new Animal(); // will generate an error

To access the abstract class, it must be inherited from another class. Let’s convert the Animal class we used in the Polymorphism chapter to an abstract class:

Remember from the Inheritance chapter that we use the extends keyword to inherit from a class.

Example Get your own Java Server

// Abstract class
abstract class Animal {
  // Abstract method (does not have a body)
  public abstract void animalSound();
  // Regular method
  public void sleep() {
    System.out.println("Zzz");
  }
}

// Subclass (inherit from Animal)
class Pig extends Animal {
  public void animalSound() {
    // The body of animalSound() is provided here
    System.out.println("The pig says: wee wee");
  }
}

class Main {
  public static void main(String[] args) {
    Pig myPig = new Pig(); // Create a Pig object
    myPig.animalSound();
    myPig.sleep();
  }
}

Method Overloading and Overriding

Overriding and overloading are the core concepts in Java programming. They are the ways to implement polymorphism in our Java programs. Polymorphism is one of the OOPS Concepts.

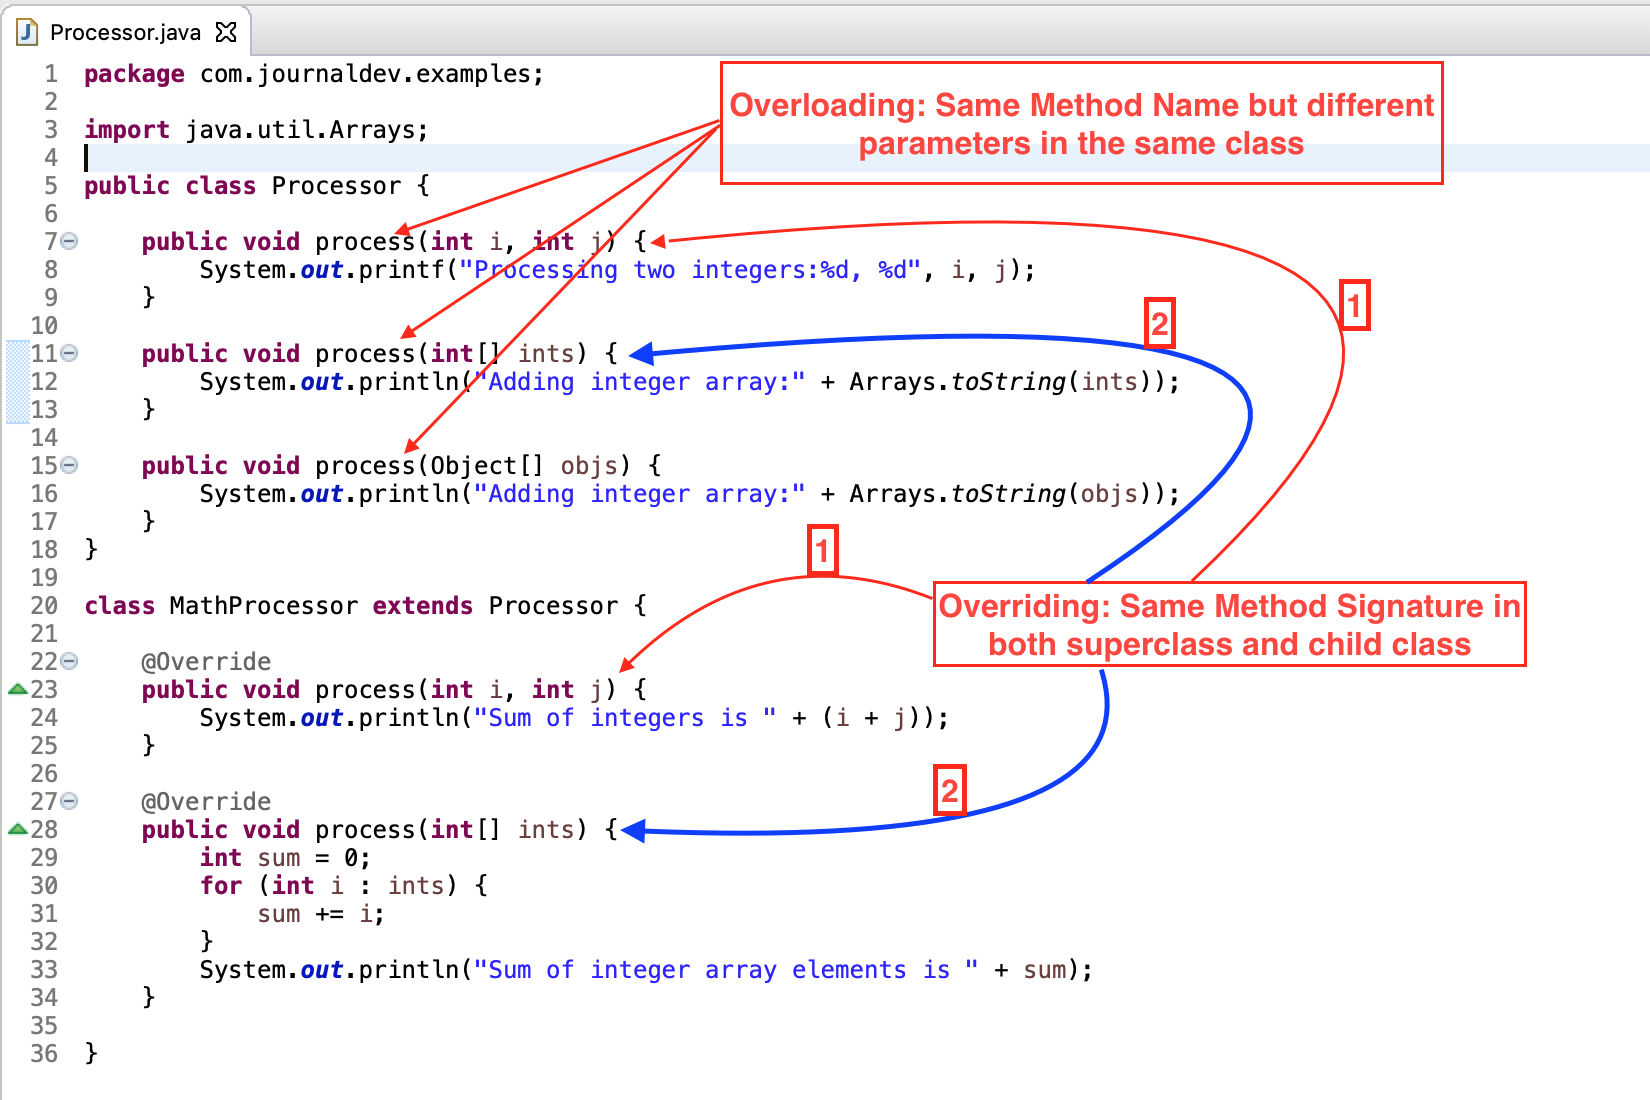
Overriding versus overloading in Java
Screenshot of Java code with arrows pointing at instances where overloading and overriding are occurring.

When the method signature (name and parameters) are the same in the superclass and the child class, it’s called overriding. When two or more methods in the same class have the same name but different parameters, it’s called overloading.

Comparing overriding and overloading

OverridingOverloading
Implements “runtime polymorphism”Implements “compile time polymorphism”
The method call is determined at runtime based on the object typeThe method call is determined at compile time
Occurs between superclass and subclassOccurs between the methods in the same class
Have the same signature (name and method arguments)Have the same name, but the parameters are different
On error, the effect will be visible at runtimeOn error, it can be caught at compile time

Overriding and overloading example

Here is an example of overloading and overriding in a Java program:

 
package com.journaldev.examples;

import java.util.Arrays;

public class Processor {

 public void process(int i, int j) {
  System.out.printf("Processing two integers:%d, %d", i, j);
 }

 public void process(int[] ints) {
  System.out.println("Adding integer array:" + Arrays.toString(ints));
 }

 public void process(Object[] objs) {
  System.out.println("Adding integer array:" + Arrays.toString(objs));
 }
}

class MathProcessor extends Processor {

 @Override
 public void process(int i, int j) {
  System.out.println("Sum of integers is " + (i + j));
 }

 @Override
 public void process(int[] ints) {
  int sum = 0;
  for (int i : ints) {
   sum += i;
  }
  System.out.println("Sum of integer array elements is " + sum);
 }

}

Overriding

The process() method and int i, int j parameters in Processor are overridden in the child class MathProcessor. Line 7 and line 23:

 
public class Processor {

    public void process(int i, int j) { /* ... */ }

}

/* ... */

class MathProcessor extends Processor {
 
    @Override
    public void process(int i, int j) {  /* ... */ }

}

And process() method and int[] ints in Processor are also overridden in the child class. Line 11 and line 28:

 
public class Processor {

    public void process(int[] ints) { /* ... */ }

}

/* ... */

class MathProcessor extends Processor {

    @Override
    public void process(Object[] objs) { /* ... */ }

}

Overloading

The process() method is overloaded in the Processor class. Lines 7, 11, and 15:

 
public class Processor {

    public void process(int i, int j) { /* ... */ }

    public void process(int[] ints) { /* ... */ }

    public void process(Object[] objs) { /* ... */ }

}
 

In this article, we covered overriding and overloading in Java. Overriding occurs when the method signature is the same in the superclass and the child class. Overloading occurs when two or more methods in the same class have the same name but different parameters.


Try-catch

The try...catch block in Java is used to handle exceptions and prevents the abnormal termination of the program.

Here’s the syntax of a try...catch block in Java.

try{
  // code
}
catch(exception) {
  // code
}

The try block includes the code that might generate an exception.

The catch block includes the code that is executed when there occurs an exception inside the try block.

Example: Java try…catch block

 
class Main {
  public static void main(String[] args) {

    try {
      int divideByZero = 5 / 0;
      System.out.println("Rest of code in try block");
    }

    catch (ArithmeticException e) {
      System.out.println("ArithmeticException => " + e.getMessage());
    }
  }
}

Output

ArithmeticException => / by zero

In the above example, notice the line,

int divideByZero = 5 / 0;

Here, we are trying to divide a number by zero. In this case, an exception occurs. Hence, we have enclosed this code inside the try block.

When the program encounters this code, ArithmeticException occurs. And, the exception is caught by the catch block and executes the code inside the catch block.

The catch block is only executed if there exists an exception inside the try block.

Note: In Java, we can use a try block without a catch block. However, we cannot use a catch block without a try block.

Java try…finally block

We can also use the try block along with a finally block.

In this case, the finally block is always executed whether there is an exception inside the try block or not.

Example: Java try…finally block

 
class Main {
  public static void main(String[] args) {
    try {
      int divideByZero = 5 / 0;
    }

    finally {
      System.out.println("Finally block is always executed");
    }
  }
}

Output

Finally block is always executed
Exception in thread "main" java.lang.ArithmeticException: / by zero
        at Main.main(Main.java:4)

In the above example, we have used the try block along with the finally block. We can see that the code inside the try block is causing an exception.

However, the code inside the finally block is executed irrespective of the exception.

Java try…catch…finally block

In Java, we can also use the finally block after the try...catch block. For example,

 
import java.io.*;

class ListOfNumbers {

  // create an integer array
  private int[] list = {5, 6, 8, 9, 2};

  // method to write data from array to a fila
  public void writeList() {
    PrintWriter out = null;

    try {
      System.out.println("Entering try statement");

      // creating a new file OutputFile.txt
      out = new PrintWriter(new FileWriter("OutputFile.txt"));

      // writing values from list array to Output.txt
      for (int i = 0; i < 7; i++) {
        out.println("Value at: " + i + " = " + list[i]);
      }
    }
    
    catch (Exception e) {
      System.out.println("Exception => " + e.getMessage());
    }
    
    finally {
      // checking if PrintWriter has been opened
      if (out != null) {
        System.out.println("Closing PrintWriter");
        // close PrintWriter
        out.close();
      }
      
      else {
        System.out.println("PrintWriter not open");
      }
    }

  }
}

class Main {
  public static void main(String[] args) {
    ListOfNumbers list = new ListOfNumbers();
    list.writeList();
  }
}

Output

Entering try statement
Exception => Index 5 out of bounds for length 5
Closing PrintWriter

In the above example, we have created an array named list and a file named output.txt. Here, we are trying to read data from the array and storing to the file.

Notice the code,

for (int i = 0; i < 7; i++) {
  out.println("Value at: " + i + " = " + list[i]);
}


Here, the size of the array is 5 and the last element of the array is at list[4]. However, we are trying to access elements at a[5] and a[6].

Hence, the code generates an exception that is caught by the catch block.

Since the finally block is always executed, we have included code to close the PrintWriter inside the finally block.

It is a good practice to use finally block to include important cleanup code like closing a file or connection.

Note: There are some cases when a finally block does not execute:

  • Use of System.exit() method
  • An exception occurs in the finally block
  • The death of a thread

Multiple Catch blocks

For each try block, there can be zero or more catch blocks. Multiple catch blocks allow us to handle each exception differently.

The argument type of each catch block indicates the type of exception that can be handled by it. For example,

 
class ListOfNumbers {
  public int[] arr = new int[10];

  public void writeList() {

    try {
      arr[10] = 11;
    }
    
    catch (NumberFormatException e1) {
      System.out.println("NumberFormatException => " + e1.getMessage());
    }
    
    catch (IndexOutOfBoundsException e2) {
      System.out.println("IndexOutOfBoundsException => " + e2.getMessage());
    }

  }
}

class Main {
  public static void main(String[] args) {
    ListOfNumbers list = new ListOfNumbers();
    list.writeList();
  }
}

Output

IndexOutOfBoundsException => Index 10 out of bounds for length 10

In this example, we have created an integer array named arr of size 10.

Since the array index starts from 0, the last element of the array is at arr[9]. Notice the statement,

arr[10] = 11;

Here, we are trying to assign a value to the index 10. Hence, IndexOutOfBoundException occurs.

When an exception occurs in the try block,

  • The exception is thrown to the first catch block. The first catch block does not handle an IndexOutOfBoundsException, so it is passed to the next catch block.
  • The second catch block in the above example is the appropriate exception handler because it handles an IndexOutOfBoundsException. Hence, it is executed.

Catching Multiple Exceptions

From Java SE 7 and later, we can now catch more than one type of exception with one catch block.

This reduces code duplication and increases code simplicity and efficiency.

Each exception type that can be handled by the catch block is separated using a vertical bar |.

Its syntax is:

try {
  // code
} catch (ExceptionType1 | Exceptiontype2 ex) { 
  // catch block
}

To learn more, visit Java catching multiple exceptions.

Java try-with-resources statement

The try-with-resources statement is a try statement that has one or more resource declarations.

Its syntax is:

try (resource declaration) {
  // use of the resource
} catch (ExceptionType e1) {
  // catch block
}

The resource is an object to be closed at the end of the program. It must be declared and initialized in the try statement.

Let’s take an example.

try (PrintWriter out = new PrintWriter(new FileWriter("OutputFile.txt"))) {
  // use of the resource
}

The try-with-resources statement is also referred to as automatic resource management. This statement automatically closes all the resources at the end of the statement.

Finally

The finally block in java is used to put important codes such as clean up code e.g. closing the file or closing the connection. The finally block executes whether exception rise or not and whether exception handled or not. A finally contains all the crucial statements regardless of the exception occurs or not.

There are 3 possible cases where finally block can be used:

Case 1: When an exception does not rise

In this case, the program runs fine without throwing any exception and finally block execute after the try block.


// Java program to demonstrate
// finally block in java When
// exception does not rise 
 
import java.io.*;
 
class GFG {
    public static void main(String[] args)
    {
        try {
            System.out.println("inside try block");
           
            // Not throw any exception
            System.out.println(34 / 2);
        }
       
        // Not execute in this case
        catch (ArithmeticException e) {
           
            System.out.println("Arithmetic Exception");
           
        }
        // Always execute
        finally {
           
            System.out.println(
                "finally : i execute always.");
           
        }
    }
}

Output

inside try block
17
finally : i execute always.

Case 2: When the exception rises and handled by the catch block


// Java program to demonstrate finally block in java
// When exception rise and handled by catch
 
import java.io.*;
 
class GFG {
   
    public static void main(String[] args)
    {
        try {
            System.out.println("inside try block");
 
            // Throw an Arithmetic exception
            System.out.println(34 / 0);
        }
 
        // catch an Arithmetic exception
        catch (ArithmeticException e) {
 
            System.out.println(
                "catch : exception handled.");
        }
 
        // Always execute
        finally {  
           
          System.out.println("finally : i execute always.");
        }
    }
}

Output

inside try block
catch : exception handled.
finally : i execute always.

Case 3: When exception rise and not handled by the catch block 

In this case, the program throws an exception but not handled by catch so finally block execute after the try block and after the execution of finally block program terminate abnormally, But finally block execute fine.


// Java program to demonstrate finally block 
// When exception rise and not handled by catch
 
import java.io.*;
 
class GFG {
    public static void main(String[] args)
    {
        try {
            System.out.println("Inside try block");
 
            // Throw an Arithmetic exception
            System.out.println(34 / 0);
        }
 
        // Can not accept Arithmetic type exception
        // Only accept Null Pointer type Exception
        catch (NullPointerException e) {
 
            System.out.println(
                "catch : exception not handled.");
        }
 
        // Always execute
        finally {
 
            System.out.println(
                "finally : i will execute always.");
        }
        // This will not execute
        System.out.println("i want to run");
    }
}

Output

Inside try block
finally : i will execute always.
Exception in thread "main" java.lang.ArithmeticException: / by zero
    at GFG.main(File.java:10)

Throws and Throw

In Java, exceptions can be categorized into two types:

  • Unchecked Exceptions: They are not checked at compile-time but at run-time.For example: ArithmeticExceptionNullPointerExceptionArrayIndexOutOfBoundsException, exceptions under Error class, etc.
  • Checked Exceptions: They are checked at compile-time. For example, IOExceptionInterruptedException, etc.

Refer to Java Exceptions to learn in detail about checked and unchecked exceptions.

Usually, we don’t need to handle unchecked exceptions. It’s because unchecked exceptions occur due to programming errors. And, it is a good practice to correct them instead of handling them.

This tutorial will now focus on how to handle checked exceptions using throw and throws.

Java throws keyword

We use the throws keyword in the method declaration to declare the type of exceptions that might occur within it.

Its syntax is:

accessModifier returnType methodName() throws ExceptionType1, ExceptionType2 … {
  // code
}

As you can see from the above syntax, we can use throws to declare multiple exceptions.

Example 1: Java throws Keyword

 
import java.io.*;
class Main {
  public static void findFile() throws IOException {
    // code that may produce IOException
    File newFile=new File("test.txt");
    FileInputStream stream=new FileInputStream(newFile);
  }

  public static void main(String[] args) {
    try{
      findFile();
    } catch(IOException e){
      System.out.println(e);
    }
  }
}

Output

java.io.FileNotFoundException: test.txt (No such file or directory)

When we run this program, if the file test.txt does not exist, FileInputStream throws a FileNotFoundException which extends the IOException class.

If a method does not handle exceptions, the type of exceptions that may occur within it must be specified in the throws clause so that methods further up in the call stack can handle them or specify them using throws keyword themselves.

The findFile() method specifies that an IOException can be thrown. The main() method calls this method and handles the exception if it is thrown.

Throwing multiple exceptions

Here’s how we can throw multiple exceptions using the throws keyword.

import java.io.*;
class Main {
  public static void findFile() throws NullPointerException, IOException, InvalidClassException {
    
    // code that may produce NullPointerException
    … … … 

    // code that may produce IOException
    … … … 

    // code that may produce InvalidClassException 
    … … … 
  }

  public static void main(String[] args) {
    try{
      findFile();
    } catch(IOException e1){
      System.out.println(e1.getMessage());
    } catch(InvalidClassException e2){
      System.out.println(e2.getMessage());
    }
  }
}
 

Here, the findFile() method specifies that it can throw NullPointerExceptionIOException, and InvalidClassException in its throws clause.

Note that we have not handled the NullPointerException. This is because it is an unchecked exception. It is not necessary to specify it in the throws clause and handle it.

throws keyword Vs. try…catch…finally

There might be several methods that can cause exceptions. Writing try...catch for each method will be tedious and code becomes long and less-readable.

throws is also useful when you have checked exception (an exception that must be handled) that you don’t want to catch in your current method.

Java throw keyword

The throw keyword is used to explicitly throw a single exception.

When an exception is thrown, the flow of program execution transfers from the try block to the catch block. We use the throw keyword within a method.

Its syntax is:

throw throwableObject;

A throwable object is an instance of class Throwable or subclass of the Throwable class.

Example 2: Java throw keyword

 
class Main {
  public static void divideByZero() {
    throw new ArithmeticException("Trying to divide by 0");
  }

  public static void main(String[] args) {
    divideByZero();
  }
}

Output

Exception in thread "main" java.lang.ArithmeticException: Trying to divide by 0
    at Main.divideByZero(Main.java:3)
    at Main.main(Main.java:7)
exit status 1

In this example, we are explicitly throwing an ArithmeticException.

Note: ArithmeticException is an unchecked exception. It’s usually not necessary to handle unchecked exceptions.

Example 3: Throwing checked exception

 
import java.io.*;
class Main {
  public static void findFile() throws IOException {
    throw new IOException("File not found");
  }

  public static void main(String[] args) {
    try {
      findFile();
      System.out.println("Rest of code in try block");
    } catch (IOException e) {
      System.out.println(e.getMessage());
    }
  }
}

Output

File not found

The findFile() method throws an IOException with the message we passed to its constructor.

Note that since it is a checked exception, we must specify it in the throws clause.

The methods that call this findFile() method need to either handle this exception or specify it using throws keyword themselves.

We have handled this exception in the main() method. The flow of program execution transfers from the try block to catch block when an exception is thrown. So, the rest of the code in the try block is skipped and statements in the catch block are executed.

Custom Exceptions

The custom exception refers to the creation of your own exception to customize an exception according to the needs. The custom exceptions are derived from the Exception class.

Need of Java Custom Exceptions

  • To categorize the exceptions based on the different types of errors in your project.
  • To allow application-level exception handling.

Create a Custom Exception in Java

To create a custom exception, you need to create a class that must be inherited from the Exception class.

Syntax

Here is the syntax to create a custom class in Java –

class MyException extends Exception { }

You just need to extend the predefined Exception class to create your own Exception. These are considered to be checked exceptions.

Rules to Create Custom Exception

Keep the following points in mind when writing your own exception classes −

  • All exceptions must be a child of Throwable.

  • If you want to write a checked exception that is automatically enforced by the Handle or Declare Rule, you need to extend the Exception class.

  • If you want to write a runtime exception, you need to extend the RuntimeException class.

Java Custom Exception Example

The following InsufficientFundsException class is a user-defined exception that extends the Exception class, making it a checked exception. An exception class is like any other class, containing useful fields and methods.

class InsufficientFundsException extends Exception { private double amount; public InsufficientFundsException(double amount) { this.amount = amount; } public double getAmount() { return amount; } }

To demonstrate using our user-defined exception, the following CheckingAccount class contains a withdraw() method that throws an InsufficientFundsException.

class CheckingAccount { private double balance; private int number; public CheckingAccount(int number) { this.number = number; } public void deposit(double amount) { balance += amount; } public void withdraw(double amount) throws InsufficientFundsException { if(amount <= balance) { balance -= amount; }else { double needs = amount balance; throw new InsufficientFundsException(needs); } } public double getBalance() { return balance; } public int getNumber() { return number; } }

The following BankDemo program demonstrates invoking the deposit() and withdraw() methods of CheckingAccount.

package com.tutorialspoint; public class BankDemo { public static void main(String [] args) { CheckingAccount c = new CheckingAccount(101); System.out.println(“Depositing $500…”); c.deposit(500.00); try { System.out.println(“\nWithdrawing $100…”); c.withdraw(100.00); System.out.println(“\nWithdrawing $600…”); c.withdraw(600.00); } catch (InsufficientFundsException e) { System.out.println(“Sorry, but you are short $” + e.getAmount()); e.printStackTrace(); } } } class CheckingAccount { private double balance; private int number; public CheckingAccount(int number) { this.number = number; } public void deposit(double amount) { balance += amount; } public void withdraw(double amount) throws InsufficientFundsException { if(amount <= balance) { balance -= amount; }else { double needs = amount balance; throw new InsufficientFundsException(needs); } } public double getBalance() { return balance; } public int getNumber() { return number; } } class InsufficientFundsException extends Exception { private double amount; public InsufficientFundsException(double amount) { this.amount = amount; } public double getAmount() { return amount; } }

Output

Compile all the above three files and run BankDemo. This will produce the following result −

Depositing $500...

Withdrawing $100...

Withdrawing $600...
Sorry, but you are short $200.0
com.tutorialspoint.InsufficientFundsException
	at com.tutorialspoint.CheckingAccount.withdraw(BankDemo.java:39)
	at com.tutorialspoint.BankDemo.main(BankDemo.java:14)

In next example, we’re declaring our custom exception as RuntimeException to make it as unchecked exception class as below −

class MyException extends RuntimeException { }

Example to Create Custom Class by Extending Runtime Exception

We are extending the predefined RuntimeException class to create your own Exception as an unchecked exception. The following InsufficientFundsException class is a user-defined exception that extends the RuntimeException class, making it a unchecked exception. An RuntimeException class is like any other class, containing useful fields and methods.

class InsufficientFundsException extends RuntimeException { private double amount; public InsufficientFundsException(double amount) { this.amount = amount; } public double getAmount() { return amount; } }

The following BankDemo program demonstrates invoking the deposit() and withdraw() methods of CheckingAccount using unchecked exception.

package com.tutorialspoint; public class BankDemo { public static void main(String [] args) { CheckingAccount c = new CheckingAccount(101); System.out.println(“Depositing $500…”); c.deposit(500.00); System.out.println(“\nWithdrawing $100…”); c.withdraw(100.00); System.out.println(“\nWithdrawing $600…”); c.withdraw(600.00); } } class CheckingAccount { private double balance; private int number; public CheckingAccount(int number) { this.number = number; } public void deposit(double amount) { balance += amount; } public void withdraw(double amount) { if(amount <= balance) { balance -= amount; }else { double needs = amount balance; throw new InsufficientFundsException(needs); } } public double getBalance() { return balance; } public int getNumber() { return number; } } class InsufficientFundsException extends RuntimeException { private double amount; public InsufficientFundsException(double amount) { this.amount = amount; } public double getAmount() { return amount; } }

Output

Compile and run BankDemo. This will produce the following result −

Depositing $500...

Withdrawing $100...

Withdrawing $600...
Exception in thread "main" 
com.tutorialspoint.InsufficientFundsException
	at com.tutorialspoint.CheckingAccount.withdraw(BankDemo.java:35)
	at com.tutorialspoint.BankDemo.main(BankDemo.java:13)

List (ArrayList, LinkedList)

An array is a collection of items stored at contiguous memory locations. The idea is to store multiple items of the same type together. However, the limitation of the array is that the size of the array is predefined and fixed. There are multiple ways to solve this problem. In this article, the difference between two classes that are implemented to solve this problem named ArrayList and LinkedList is discussed.

Java Collections Framework Hierarchy

ArrayList is a part of the collection framework. It is present in the java.util package and provides us dynamic arrays in Java. Though, it may be slower than standard arrays but can be helpful in programs where lots of manipulation in the array is needed. We can dynamically add and remove items. It automatically resizes itself. The following is an example to demonstrate the implementation of the ArrayList.

Example

 
// Java program to Illustrate Working of an ArrayList
 
// Importing required classes
import java.io.*;
import java.util.*;
 
// Main class
class GFG {
 
    // Main driver method
    public static void main(String[] args)
    {
        // Creating an ArrayList of Integer type
        ArrayList<Integer> arrli
            = new ArrayList<Integer>();
 
        // Appending the new elements
        // at the end of the list
        // using add () method via for loops
        for (int i = 1; i <= 5; i++)
            arrli.add(i);
 
        // Printing the ArrayList
        System.out.println(arrli);
 
        // Removing an element at index 3
        // from the ArrayList
        // using remove() method
        arrli.remove(3);
 
        // Printing the ArrayList after
        // removing the element
        System.out.println(arrli);
    }
}

Output

[1, 2, 3, 4, 5]
[1, 2, 3, 5]

LinkedList is a linear data structure where the elements are not stored in contiguous locations and every element is a separate object with a data part and address part. The elements are linked using pointers and addresses. Each element is known as a node. Due to the dynamicity and ease of insertions and deletions, they are preferred over the arrays. The following is an example to demonstrate the implementation of the LinkedList.

Example

// Java program to Demonstrate Working of a LinkedList
 
// Importing required classes
import java.util.*;
 
// Main class
class GFG {
 
    // main driver method
    public static void main(String args[])
    {
 
        // Creating an object of the
        // class linked list
        LinkedList<String> object
            = new LinkedList<String>();
 
        // Adding the elements to the object created
        // using add() and addLast() method
 
        // Custom input elements
        object.add("A");
        object.add("B");
        object.addLast("C");
 
        // Print the current LinkedList
        System.out.println(object);
 
        // Removing elements from the List object
        // using remove() and removeFirst() method
        object.remove("B");
        object.removeFirst();
 
        System.out.println("Linked list after "
                           + "deletion: " + object);
    }
}

Output

[A, B, C]
Linked list after deletion: [C]

Now after having an adequate understanding of both of them let us do discuss the differences between ArrayList and LinkedList in Java

 ArrayListLinkedList
1.This class uses a dynamic array to store the elements in it. With the introduction of generics, this class supports the storage of all types of objects.This class uses a doubly linked list to store the elements in it. Similar to the ArrayList, this class also supports the storage of all types of objects.
2.Manipulating ArrayList takes more time due to the internal implementation. Whenever we remove an element, internally, the array is traversed and the memory bits are shifted.Manipulating LinkedList takes less time compared to ArrayList because, in a doubly-linked list, there is no concept of shifting the memory bits. The list is traversed and the reference link is changed.
3.Inefficient memory utilization.Good memory utilization.
4.It can be one, two or multi-dimensional.It can either be single, double or circular LinkedList.
5.Insertion operation is slow.Insertion operation is fast.
6.This class implements a List interface. Therefore, this acts as a list.This class implements both the List interface and the Deque interface. Therefore, it can act as a list and a deque.
7.This class works better when the application demands storing the data and accessing it.This class works better when the application demands manipulation of the stored data.
8.Data access and storage is very efficient as it stores the elements according to the indexes.Data access and storage is slow in LinkedList.
9.Deletion operation is not very efficient.Deletion operation is very efficient.
10.It is used to store only similar types of data.It is used to store any types of data.
11.Less memory is used.More memory is used.
12.This is known as static memory allocation.This is known as dynamic memory allocation.

ArrayList is an implementation of the List interface that uses an array to store its elements. It has a fast indexed access time, which means that retrieving elements from an ArrayList by an index is very quick. 

For example, the following code demonstrates how to retrieve an element from an ArrayList:

 
import java.io.*;
import java.util.ArrayList;
 
class GFG {
    public static void main(String[] args) {
        ArrayList<Integer> numbers = new ArrayList<>();
        numbers.add(1);
        numbers.add(2);
        numbers.add(3);
        int thirdNumber = numbers.get(2);
        System.out.println("The third number is: " + thirdNumber);
    }
}

Output

The third number is: 3

In addition, inserting or deleting elements from the middle of an ArrayList can be slow, as the entire array needs to be shifted in memory to make room for the new element or to close the gap left by the deleted element.

For example, the following code demonstrates how to insert an element in the middle of an ArrayList:

 
import java.io.*;
import java.util.ArrayList;
 
class GFG {
    public static void main(String[] args) {
        ArrayList<Integer> numbers = new ArrayList<>();
        numbers.add(1);
        numbers.add(2);
        numbers.add(3);
        numbers.add(2, 4);
        System.out.println("The numbers are: " + numbers);
    }
}

Output

The numbers are: [1, 2, 4, 3]

LinkedList, on the other hand, is an implementation of the List interface that uses a linked list data structure to store its elements.

Unlike an ArrayList, a LinkedList does not use an array to store its elements. Instead, each element in a LinkedList is represented by a node that contains a reference to the data stored in the node and a reference to the next node in the list.

Set (HashSet, TreeSet)

A Set is a generic set of values with no duplicate elements. A TreeSet is a set where the elements are sorted.

A HashSet is a set where the elements are not sorted or ordered. It is faster than a TreeSet. The HashSet is an implementation of a Set.

Set is a parent interface of all set classes like TreeSet, HashSet, etc.

Example

import java.util.*;
public class Demo {
   public static void main(String args[]) {
      int a[] = {77, 23, 4, 66, 99, 112, 45, 56, 39, 89};
      Set<Integer> s = new HashSet<Integer>();
      try {
         for(int i = 0; i < 5; i++) {
            s.add(a[i]);
         }
         System.out.println(s);
         TreeSet sorted = new TreeSet<Integer>(s);
         System.out.println("Sorted list = ");
         System.out.println(sorted);
      } 
      catch(Exception e) {}
   }
}

Output

[66, 99, 4, 23, 77]
Sorted list =
[4, 23, 66, 77, 99]
 

Map (HashMap, LinkedHashMap, TreeMap)

HashMap, TreeMap and LinkedHashMap all implements java.util.Map interface and following are their characteristics.

HashMap

  • HashMap has complexity of O(1) for insertion and lookup.
  • HashMap allows one null key and multiple null values.
  • HashMap does not maintain any order.

TreeMap

  • TreeMap has complexity of O(logN) for insertion and lookup.
  • TreeMap does not allow null key but allow multiple null values.
  • TreeMap maintains order. It stores keys in sorted and ascending order.

Learn Java in-depth with real-world projects through our Java certification course. Enroll and become a certified expert to boost your career.

LinkedHashMap

  • LinkedHashMap has complexity of O(1) for insertion and lookup.
  • LinkedHashMap allows one null key and multiple null values.
  • LinkedHashMap maintains order in which key-value pairs are inserted.

Example

import java.util.HashMap;
import java.util.Hashtable;
import java.util.LinkedHashMap;
import java.util.Map;
import java.util.TreeMap;

public class Tester {
   public static void main(String args[]) {

      Map<String, String> map = new HashMap<String, String>();
      map.put("One", "1");
      map.put("Five", "5");
      map.put("Four", "4");
      map.put("Two", "2");
      map.put("Three", "3");
      System.out.println("HashMap: 
" + map);

      Map<String, String> map1 = new LinkedHashMap<String, String>();
      map1.put("One", "1");
      map1.put("Five", "5");
      map1.put("Four", "4");
      map1.put("Two", "2");
      map1.put("Three", "3");
      System.out.println("LinkedHashMap: 
" + map1);

      Map<String, String> map2 = new TreeMap<String, String>();
      map2.put("One", "1");
      map2.put("Five", "5");
      map2.put("Four", "4");
      map2.put("Two", "2");
      map2.put("Three", "3");
      System.out.println("TreeMap: 
" + map2);
   }
}

Output

HashMap:
{Five = 5, One = 1, Four = 4, Two = 2, Three = 3}
LinkedHashMap:
{One = 1, Five = 5, Four = 4, Two = 2, Three = 3}
TreeMap:
{Five = 5, Four = 4, One = 1, Three = 3, Two = 2}

Here you see, HashMap has random order of Keys, LinkedHashMap has preserved the order in which keys are inserted and TreeMap has sorted order of keys.

Iterators and Streams

The iterate(T, java.util.function.Predicate, java.util.function.UnaryOperator) method allows us to iterate stream elements till the specified condition. This method returns a sequential ordered Stream produced by iterative application of the given next function to an initial element, conditioned on satisfying hasNext predicate passed as parameter. The stream terminates as soon as the hasNext predicate returns false.

The resulting sequence returned by this method may be empty if passed predicate does not hold on the seed value. Otherwise, the first element will be the supplied seed value, the next element will be the result of applying the next function to the seed value, and so on iteratively until the hasNext predicate indicates that the stream should terminate.

Syntax:

static <T> Stream<T> iterate(T seed,
                             Predicate<T> hasNext,
                             UnaryOperator<T> next)

Parameters: This method accepts three parameters:

  • seed: which is the initial element,
  • hasNext: which is a predicate to apply to elements to determine when the stream must terminate and
  • next: which is a function to be applied to the previous element to produce a new element.

Return value: This method returns a new sequential Stream.

Below programs illustrate iterate(T, java.util.function.Predicate, java.util.function.UnaryOperator) method:

Program 1:

// Java program to demonstrate
// Stream.iterate method
 
import java.util.stream.Stream;
public class GFG {
 
    public static void main(String[] args)
    {
 
        // create a stream using iterate
        Stream<Integer> stream
            = Stream.iterate(1,
                             i -> i <= 20, i -> i * 2);
 
        // print Values
        stream.forEach(System.out::println);
    }
}

The output printed on console of IDE is shown below.
Output:

Program 2:

// Java program to demonstrate
// Stream.iterate method
 
import java.util.stream.Stream;
public class GFG {
 
    public static void main(String[] args)
    {
 
        // create a stream using iterate
        Stream<Double> stream
            = Stream.iterate(2.0,
                             decimal -> decimal > 0.25, decimal -> decimal / 2);
 
        // print Values
        stream.forEach(System.out::println);
    }
}

The output printed on console of IDE is shown below.
Output:

Java FileWriter and FileReader classes are used to write and read data from text files. It is recommended not to use the FileInputStream and FileOutputStream classes if you have to read and write any textual information as these are Byte stream classes.

FileWriter

FileWriter is useful to create a file writing characters into it.
  • This class inherits from the OutputStream class.
  • The constructors of this class assume that the default character encoding and the default byte-buffer size are acceptable. To specify these values yourself, construct an OutputStreamWriter on a FileOutputStream.
  • FileWriter is meant for writing streams of characters. For writing streams of raw bytes, consider using a FileOutputStream.
  • FileWriter creates the output file if it is not present already.
Constructors:
  • FileWriter(File file) – Constructs a FileWriter object given a File object.
  • FileWriter (File file, boolean append) – constructs a FileWriter object given a File object.
  • FileWriter (FileDescriptor fd) – constructs a FileWriter object associated with a file descriptor.
  • FileWriter (String fileName) – constructs a FileWriter object given a file name.
  • FileWriter (String fileName, Boolean append) – Constructs a FileWriter object given a file name with a Boolean indicating whether or not to append the data written.
Methods:
  • public void write (int c) throws IOException – Writes a single character.
  • public void write (char [] stir) throws IOException – Writes an array of characters.
  • public void write(String str)throws IOException – Writes a string.
  • public void write(String str, int off, int len)throws IOException – Writes a portion of a string. Here off is offset from which to start writing characters and len is the number of characters to write.
  • public void flush() throws IOException flushes the stream
  • public void close() throws IOException flushes the stream first and then closes the writer.
Reading and writing take place character by character, which increases the number of I/O operations and affects the performance of the system.BufferedWriter can be used along with FileWriter to improve the speed of execution. The following program depicts how to create a text file using FileWriter
// Creating a text File using FileWriter
import java.io.FileWriter;
import java.io.IOException;
class CreateFile
{
    public static void main(String[] args) throws IOException
    {
        // Accept a string 
        String str = "File Handling in Java using "+
                " FileWriter and FileReader";
 
        // attach a file to FileWriter 
        FileWriter fw=new FileWriter("output.txt");
 
        // read character wise from string and write 
        // into FileWriter 
        for (int i = 0; i < str.length(); i++)
            fw.write(str.charAt(i));
 
        System.out.println("Writing successful");
        //close the file 
        fw.close();
    }
}

FileReader

FileReader is useful to read data in the form of characters from a ‘text’ file.
  • This class inherited from the InputStreamReader Class.
  • The constructors of this class assume that the default character encoding and the default byte-buffer size are appropriate. To specify these values yourself, construct an InputStreamReader on a FileInputStream.
  • FileReader is meant for reading streams of characters. For reading streams of raw bytes, consider using a FileInputStream.
Constructors:
  • FileReader(File file) – Creates a FileReader , given the File to read from
  • FileReader(FileDescripter fd) – Creates a new FileReader , given the FileDescripter to read from
  • FileReader(String fileName) – Creates a new FileReader , given the name of the file to read from
Methods:
  • public int read () throws IOException – Reads a single character. This method will block until a character is available, an I/O error occurs, or the end of the stream is reached.
  • public int read(char[] cbuff) throws IOException – Reads characters into an array. This method will block until some input is available, an I/O error occurs, or the end of the stream is reached.
  • public abstract int read(char[] buff, int off, int len) throws IOException –Reads characters into a portion of an array. This method will block until some input is available, an I/O error occurs, or the end of the stream is reached. Parameters: cbuf – Destination buffer off – Offset at which to start storing characters len – Maximum number of characters to read
  • public void close() throws IOException closes the reader.
  • public long skip(long n) throws IOException –Skips characters. This method will block until some characters are available, an I/O error occurs, or the end of the stream is reached. Parameters: n – The number of characters to skip
The following program depicts how to read from the ‘text’ file using FileReader
// Reading data from a file using FileReader
import java.io.FileNotFoundException;
import java.io.FileReader;
import java.io.IOException;
class ReadFile
{
    public static void main(String[] args) throws IOException
    {
        // variable declaration
        int ch;
 
        // check if File exists or not
        FileReader fr=null;
        try
        {
            fr = new FileReader("text");
        }
        catch (FileNotFoundException fe)
        {
            System.out.println("File not found");
        }
 
        // read from FileReader till the end of file
        while ((ch=fr.read())!=-1)
            System.out.print((char)ch);
 
        // close the file
        fr.close();
    }
}

BufferedReader

The BufferedReader class of the java.io package can be used with other readers to read data (in characters) more efficiently.

It extends the abstract class Reader.
The BufferedReader class extends the Reader class in Java

Working of BufferedReader

The BufferedReader maintains an internal buffer of 8192 characters. During the read operation in BufferedReader, a chunk of characters is read from the disk and stored in the internal buffer. And from the internal buffer characters are read individually. Hence, the number of communication to the disk is reduced. This is why reading characters is faster using BufferedReader.

Create a BufferedReader

In order to create a BufferedReader, we must import the java.io.BuferedReader package first. Once we import the package, here is how we can create the reader.
// Creates a FileReader
FileReader file = new FileReader(String file);

// Creates a BufferedReader
BufferedReader buffer = new BufferedReader(file);
In the above example, we have created a BufferedReader named buffer with the FileReader named file. Here, the internal buffer of the BufferedReader has the default size of 8192 characters. However, we can specify the size of the internal buffer as well.
// Creates a BufferdReader with specified size internal buffer
BufferedReader buffer = new BufferedReader(file, int size);
The buffer will help to read characters from the files more quickly.

Methods of BufferedReader

The BufferedReader class provides implementations for different methods present in Reader.

read() Method

  • read() – reads a single character from the internal buffer of the reader
  • read(char[] array) – reads the characters from the reader and stores in the specified array
  • read(char[] array, int start, int length) – reads the number of characters equal to length from the reader and stores in the specified array starting from the position start
For example, suppose we have a file named input.txt with the following content.
This is a line of text inside the file.
Let’s try to read the file using BufferedReader.
import java.io.FileReader;
import java.io.BufferedReader;

class Main {
  public static void main(String[] args) {

    // Creates an array of character
    char[] array = new char[100];

    try {
      // Creates a FileReader
      FileReader file = new FileReader("input.txt");

      // Creates a BufferedReader
      BufferedReader input = new BufferedReader(file);

      // Reads characters
      input.read(array);
      System.out.println("Data in the file: ");
      System.out.println(array);

      // Closes the reader
      input.close();
    }

    catch(Exception e) {
      e.getStackTrace();
    }
  }
}
Output
Data in the file:
This is a line of text inside the file.
In the above example, we have created a buffered reader named input. The buffered reader is linked with the input.txt file.
FileReader file = new FileReader("input.txt");
BufferedReader input = new BufferedReader(file);
Here, we have used the read() method to read an array of characters from the internal buffer of the buffered reader.

skip() Method

To discard and skip the specified number of characters, we can use the skip() method. For example,
import java.io.FileReader;
import java.io.BufferedReader;

public class Main {

  public static void main(String args[]) {

    // Creates an array of characters
    char[] array = new char[100];

    try {
      // Suppose, the input.txt file contains the following text
      // This is a line of text inside the file.
      FileReader file = new FileReader("input.txt");

      // Creates a BufferedReader
      BufferedReader input = new BufferedReader(file);

      // Skips the 5 characters
      input.skip(5);

      // Reads the characters
      input.read(array);

      System.out.println("Data after skipping 5 characters:");
      System.out.println(array);

      // closes the reader
      input.close();
    }

    catch (Exception e) {
      e.getStackTrace();
    }
  }
}
Output
Data after skipping 5 characters:
is a line of text inside the file.
In the above example, we have used the skip() method to skip 5 characters from the file reader. Hence, the characters 'T''h''i''s' and ' ' are skipped from the original file.

close() Method

To close the buffered reader, we can use the close() method. Once the close() method is called, we cannot use the reader to read the data.

Other Methods of BufferedReader

Method Description
ready() checks if the file reader is ready to be read
mark() mark the position in reader up to which data has been read
reset() returns the control to the point in the reader where the mark was set

BufferedWriter

Bufferreader class writes text to character-output stream, buffering characters.Thus, providing efficient writing of single array, character and strings. A buffer size needs to be specified, if not it takes Default value. An output is immediately set to the underlying character or byte stream by the Writer. Class Declaration
public class BufferedWriter
   extends Writer
Constructors
  • BufferedWriter(Writer out): Creates a buffered character-output stream that uses a default-sized output buffer.
  • BufferedWriter(Writer out, int size): Creates a new buffered character-output stream that uses an output buffer of the given size.
Methods:
  • write() : java.io.BufferedWriter.write(int arg) writes a single character that is specified by an integer argument. Syntax :
public void write(int arg)
Parameters : 
arg : integer that specifies the character to write          
Return :
Doesn't return any value.
  • Implementation :
//Java program illustrating use of write(int arg) method
import java.io.*;
public class NewClass
{
    public static void main(String[] args)
    {
        //initializing FileWriter
        FileWriter geek_file;
        try
        {
            geek_file = new FileWriter("ABC.txt");
            
            // Initializing BufferedWriter
            BufferedWriter geekwrite = new BufferedWriter(geek_file);
            System.out.println("Buffered Writer start writing :)");
            
            // Use of write() method to write the value in 'ABC' file
            // Printing E
            geekwrite.write(69);
            
            // Printing 1
            geekwrite.write(49);
            // Closing BufferWriter to end operation
            geekwrite.close();
            System.out.println("Written successfully");
        }
        catch (IOException except)
        {
            except.printStackTrace();
        }
    }
}
  • Note : In the given output, you can’t see it’s action on file. Run this code on any compiler in your device. It creates a new file ‘ABC’ and write “E 1 ” in it.
Output : 
Buffered Writer start writing :)
Written successfully
  • write() : java.io.BufferedWriter.write(String arg, int offset, int length) writes String in the file according to its arguments as mentioned in the Java Code. Syntax :
public void write(String arg, int offset, int length)
Parameters : 
arg : String to be written
offset : From where to start reading the string
length : No. of characters of the string to write          
Return :
Doesn't return any value.
  • Implementation :
//Java program illustrating use of write(String arg, int offset, int length) method
import java.io.*;
public class NewClass
{
    public static void main(String[] args)
    {
        //Initializing a FileWriter
        FileWriter geek_file;
        try
        {
            geek_file = new FileWriter("ABC.txt");
        
            // Initializing a BufferedWriter
            BufferedWriter geekwrite = new BufferedWriter(geek_file);
            System.out.println("Buffered Writer start writing :)");
            String arg = "Hello Geeks";
            int offset = 6;
            geekwrite.write(arg,offset,arg.length()-offset);
            // Closing Buffer
            geekwrite.close();
            System.out.println("Written successfully");
        }
        catch (IOException except)
        {
            except.printStackTrace();
        }
    }
}
  • Note : In the given output, you can’t see it’s action on file. Run this code on any compiler in your device. It creates a new file ‘ABC’ and write “Geeks” in it.Here,
arg = Hello Geeks
offset = 6
length = arg.length So, when we minus offset : 6, it will write 'Geeks' only in the file.
  • Output:
Buffered Writer start writing :)
Written successfully
  • newLine() : java.io.BufferedWriter.newLine() breaks/separates line. Syntax :
public void newLine()       
Return :
Doesn't return any value.
  • Implementation :
//Java program explaining use of newLine() method
import java.io.*;
public class NewClass
{
    public static void main(String[] args)
    {
        //initializing FileWriter
        FileWriter geek_file;
        try
        {
            geek_file = new FileWriter("ABC.txt");
            
            // Initializing BufferedWriter
            BufferedWriter geekwrite = new BufferedWriter(geek_file);
            System.out.println("Buffered Writer start writing :)");
            
            // Use of write() method to write the value in 'ABC' file
            // Printing "GEEKS"
            geekwrite.write("GEEKS");
            
            // For next line
            geekwrite.newLine();
            
            // Printing "FOR"
            geekwrite.write("FOR");
            
             // For next line
            geekwrite.newLine();
            
            // Printing "GEEKS"
            geekwrite.write("FOR");
            // Closing BufferWriter to end operation
            geekwrite.close();
            System.out.println("Written successfully");
        }
        catch (IOException except)
        {
            except.printStackTrace();
        }
    }
}
  • Note :In the given output, you can’t see it’s action on file. Run this code on any compiler in your device. It creates a new file ‘ABC’ and write | GEEKS | | FOR | | GEEKS | Here, newLine() method breaks line after GEEKS and FOR is written in next line Output :
Buffered Writer start writing :)
Written successfully
  • flush() : java.io.BufferedWriter.flush() flushes character from write buffer. Syntax :
public void flush()    
Return :
Doesn't return any value.
  • close() : java.io.BufferedWriter.close() flushes character from write buffer and then close it. Syntax :
public void close()    
Return :
Doesn't return any value.
  • Implementation of flush(), close() method :
//Java program illustrating use of flush(), close() method
import java.io.*; //BufferedWriter, FileWriter, IOException
public class NewClass
{
    public static void main(String[] args)
    {
        FileWriter geek_file; //initializing FileWriter
        try
        {
            geek_file = new FileWriter("ABC.txt");
            // Initializing BufferedWriter
            BufferedWriter geekwrite = new BufferedWriter(geek_file);
            System.out.println("Buffered Writer start writing :)");
            // Use of write() method to write the value in 'ABC' file
            geekwrite.write(69); // Printing E
            geekwrite.newLine(); // For next line
            geekwrite.write(49); // Printing 1
            // flush() method : flushing the stream
            geekwrite.flush();
            // close() method : closing BufferWriter to end operation
            geekwrite.close();
            System.out.println("Written successfully");
        }
        catch (IOException except)
        {
            except.printStackTrace();
        }
    }
}
  • Note : You can’t see it’s action on file. Run this code on any compiler in your device.It creates a new file ‘ABC’ and write | E | | 1 | in it.Here, flush() method flushes the stream and close() method closes the writer.
Output : 
Buffered Writer start writing :)
Written successfully

Properties file handling (for test configurations)

You can configure test properties files by using the locations or value attribute of @TestPropertySource.
By default, both traditional and XML-based java.util.Properties file formats are supported — for example, "classpath:/com/example/test.properties" or "file:///path/to/file.xml". As of Spring Framework 6.1, you can configure a custom PropertySourceFactory via the factory attribute in @TestPropertySource in order to support a different file format such as JSON, YAML, etc.
Each path is interpreted as a Spring Resource. A plain path (for example, "test.properties") is treated as a classpath resource that is relative to the package in which the test class is defined. A path starting with a slash is treated as an absolute classpath resource (for example: "/org/example/test.xml"). A path that references a URL (for example, a path prefixed with classpath:file:, or http:) is loaded by using the specified resource protocol.
Property placeholders in paths (such as ${…​}) will be resolved against the Environment.
As of Spring Framework 6.1, resource location patterns are also supported — for example, "classpath*:/config/*.properties".
The following example uses a test properties file:
@ContextConfiguration
@TestPropertySource("/test.properties") 
class MyIntegrationTests {
	// class body...
}
Specifying a properties file with an absolute path.
You can configure inlined properties in the form of key-value pairs by using the properties attribute of @TestPropertySource, as shown in the next example. All key-value pairs are added to the enclosing Environment as a single test PropertySource with the highest precedence.
The supported syntax for key-value pairs is the same as the syntax defined for entries in a Java properties file:
  • key=value
  • key:value
  • key value
The following example sets two inlined properties:
@ContextConfiguration
@TestPropertySource(properties = {"timezone = GMT", "port = 4242"}) 
class MyIntegrationTests {
	// class body...
}
Setting two properties via an array of strings.
As of Spring Framework 6.1, you can use text blocks to define multiple inlined properties in a single String. The following example sets two inlined properties using a text block:
@ContextConfiguration
@TestPropertySource(properties = """
	timezone = GMT
	port = 4242
	""") 
class MyIntegrationTests {
	// class body...
}
Setting two properties via a text block.

Default Properties File Detection

If @TestPropertySource is declared as an empty annotation (that is, without explicit values for the locations or properties attributes), an attempt is made to detect a default properties file relative to the class that declared the annotation. For example, if the annotated test class is com.example.MyTest, the corresponding default properties file is classpath:com/example/MyTest.properties. If the default cannot be detected, an IllegalStateException is thrown.

Precedence

Test properties have higher precedence than those defined in the operating system’s environment, Java system properties, or property sources added by the application declaratively by using @PropertySource or programmatically. Thus, test properties can be used to selectively override properties loaded from system and application property sources. Furthermore, inlined properties have higher precedence than properties loaded from resource locations. Note, however, that properties registered via @DynamicPropertySource have higher precedence than those loaded via @TestPropertySource.
In the next example, the timezone and port properties and any properties defined in "/test.properties" override any properties of the same name that are defined in system and application property sources. Furthermore, if the "/test.properties" file defines entries for the timezone and port properties those are overridden by the inlined properties declared by using the properties attribute. The following example shows how to specify properties both in a file and inline:
@ContextConfiguration
@TestPropertySource(
	locations = "/test.properties",
	properties = {"timezone = GMT", "port = 4242"}
)
class MyIntegrationTests {
	// class body...
}

Inheriting and Overriding Test Property Sources

@TestPropertySource supports boolean inheritLocations and inheritProperties attributes that denote whether resource locations for properties files and inlined properties declared by superclasses should be inherited. The default value for both flags is true. This means that a test class inherits the locations and inlined properties declared by any superclasses. Specifically, the locations and inlined properties for a test class are appended to the locations and inlined properties declared by superclasses. Thus, subclasses have the option of extending the locations and inlined properties. Note that properties that appear later shadow (that is, override) properties of the same name that appear earlier. In addition, the aforementioned precedence rules apply for inherited test property sources as well.
If the inheritLocations or inheritProperties attribute in @TestPropertySource is set to false, the locations or inlined properties, respectively, for the test class shadow and effectively replace the configuration defined by superclasses.
In the next example, the ApplicationContext for BaseTest is loaded by using only the base.properties file as a test property source. In contrast, the ApplicationContext for ExtendedTest is loaded by using the base.properties and extended.properties files as test property source locations. The following example shows how to define properties in both a subclass and its superclass by using properties files:
@TestPropertySource("base.properties")
@ContextConfiguration
class BaseTest {
	// ...
}

@TestPropertySource("extended.properties")
@ContextConfiguration
class ExtendedTest extends BaseTest {
	// ...
}
In the next example, the ApplicationContext for BaseTest is loaded by using only the inlined key1 property. In contrast, the ApplicationContext for ExtendedTest is loaded by using the inlined key1 and key2 properties. The following example shows how to define properties in both a subclass and its superclass by using inline properties:
@TestPropertySource(properties = "key1 = value1")
@ContextConfiguration
class BaseTest {
	// ...
}

@TestPropertySource(properties = "key2 = value2")
@ContextConfiguration
class ExtendedTest extends BaseTest {
	// ...
}

Thread Class and Runnable Interface

There are two ways to create a new thread of execution. One is to declare a class to be a subclass of the Thread class. This subclass should override the run method of the Thread class. An instance of the subclass can then be allocated and started.

The other way to create a thread is to declare a class that implements the Runnable interface. That class then implements the run method. An instance of the class can then be allocated, passed as an argument when creating Thread, and started.

Every thread has a name for identification purposes. More than one thread may have the same name. If a name is not specified when a thread is created, a new name is generated for it.

Sr. No.KeyThreadRunnable
1BasicThread is a class. It is used to create a threadRunnable is a functional interface which is used to create a thread
2MethodsIt has multiple methods including start() and run()It has only abstract method run()
3 Each thread creates a unique object and gets associated with itMultiple threads share the same objects.
4MemoryMore memory requiredLess memory required
5LimitationMultiple Inheritance is not allowed in java hence after a class extends Thread class, it can not extend any other classIf a class is implementing the runnable interface then your class can extend another class.

Example of Runnable

class RunnableExample implements Runnable{
   public void run(){
      System.out.println("Thread is running for Runnable Implementation");
   }
   public static void main(String args[]){
      RunnableExample runnable=new RunnableExample();
      Thread t1 =new Thread(runnable);
      t1.start();
   }
}

Example of Thread

class ThreadExample extends Thread{
   public void run(){
      System.out.println("Thread is running");
   }
   public static void main(String args[]){
      ThreadExample t1=new ThreadExample ();
      t1.start();
   }
}

Synchronization in Java

In MultithreadingSynchronization is crucial for ensuring that multiple threads operate safely on shared resources. Without Synchronization, data inconsistency or corruption can occur when multiple threads try to access and modify shared variables simultaneously. In Java, it is a mechanism that ensures that only one thread can access a resource at any given time. This process helps prevent issues such as data inconsistency and race conditions when multiple threads interact with shared resources.

Example: Below is the Java Program to demonstrate synchronization.

// Java Program to demonstrate synchronization in Java
class Counter {
    private int c = 0; // Shared variable

    // Synchronized method to increment counter
    public synchronized void inc() {
        c++;
    }

    // Synchronized method to get counter value
    public synchronized int get() {
        return c;
    }
}

public class Geeks {
    public static void main(String[] args) {
        Counter cnt = new Counter(); // Shared resource

        // Thread 1 to increment counter
        Thread t1 = new Thread(() -> {
            for (int i = 0; i < 1000; i++) {
                cnt.inc();
            }
        });

        // Thread 2 to increment counter
        Thread t2 = new Thread(() -> {
            for (int i = 0; i < 1000; i++) {
                cnt.inc();
            }
        });

        // Start both threads
        t1.start();
        t2.start();

        // Wait for threads to finish
        try {
            t1.join();
            t2.join();
        } catch (InterruptedException e) {
            e.printStackTrace();
        }

        // Print final counter value
        System.out.println("Counter: " + cnt.get());
    }
}
 
Output
Counter: 2000

Explanation: Two threads, t1 and t2, increment the shared counter variable concurrently. The inc() and get() methods are synchronized, meaning only one thread can execute these methods at a time, preventing race conditions. The program ensures that the final value of the counter is consistent and correctly updated by both threads.

Synchronized Blocks in Java

Java provides a way to create threads and synchronise their tasks using synchronized blocks. 

synchronized block in Java is synchronized on some object. Synchronized blocks in Java are marked with the synchronized keyword. All synchronized blocks synchronize on the same object and can only have one thread executed inside them at a time. All other threads attempting to enter the synchronized block are blocked until the thread inside the synchronized block exits the block. If you want to master concurrency and understand how to avoid common pitfalls,

synchronized(sync_object)
{
// Access shared variables and other
// shared resources
}

This synchronization is implemented in Java with a concept called monitors or locks. Only one thread can own a monitor at a given time. When a thread acquires a lock, it is said to have entered the monitor. All other threads attempting to enter the locked monitor will be suspended until the first thread exits the monitor.

Example: Below is an example of synchronization using Synchronized Blocks

// Java Program to demonstrate synchronization block in Java

class Counter {
    private int c = 0; // Shared variable

    // Method with synchronization block
    public void inc() {
        synchronized(this) { // Synchronize only this block
            c++;
        }
    }

    // Method to get counter value
    public int get() {
        return c;
    }
}

public class Geeks {
    public static void main(String[] args) {
        Counter cnt = new Counter(); // Shared resource

        // Thread 1 to increment counter
        Thread t1 = new Thread(() -> {
            for (int i = 0; i < 1000; i++) {
                cnt.inc();
            }
        });

        // Thread 2 to increment counter
        Thread t2 = new Thread(() -> {
            for (int i = 0; i < 1000; i++) {
                cnt.inc();
            }
        });

        // Start both threads
        t1.start();
        t2.start();

        // Wait for threads to finish
        try {
            t1.join();
            t2.join();
        } catch (InterruptedException e) {
            e.printStackTrace();
        }

        // Print final counter value
        System.out.println("Counter: " + cnt.get());
    }
}
 
Output
Counter: 2000

Types of Synchronization

There are two synchronizations in Java mentioned below:

  1. Process Synchronization
  2. Thread Synchronization

1. Process Synchronization in Java

Process Synchronization is a technique used to coordinate the execution of multiple processes. It ensures that the shared resources are safe and in order.

Example: Here is a popular example of Process Synchronization in Java

// Java Program to demonstrate Process Synchronization
class BankAccount {
    private int balance
        = 1000; // Shared resource (bank balance)

    // Synchronized method for deposit operation
    public synchronized void deposit(int amount)
    {
        balance += amount;
        System.out.println("Deposited: " + amount
                           + ", Balance: " + balance);
    }

    // Synchronized method for withdrawal operation
    public synchronized void withdraw(int amount)
    {
        if (balance >= amount) {
            balance -= amount;
            System.out.println("Withdrawn: " + amount
                               + ", Balance: " + balance);
        }
        else {
            System.out.println(
                "Insufficient balance to withdraw: "
                + amount);
        }
    }

    public int getBalance() { return balance; }
}

public class Geeks {
    public static void main(String[] args)
    {
        BankAccount account
            = new BankAccount(); // Shared resource

        // Thread 1 to deposit money into the account
        Thread t1 = new Thread(() -> {
            for (int i = 0; i < 3; i++) {
                account.deposit(200);
                try {
                    Thread.sleep(50); // Simulate some delay
                }
                catch (InterruptedException e) {
                    e.printStackTrace();
                }
            }
        });

        // Thread 2 to withdraw money from the account
        Thread t2 = new Thread(() -> {
            for (int i = 0; i < 3; i++) {
                account.withdraw(100);
                try {
                    Thread.sleep(
                        100); // Simulate some delay
                }
                catch (InterruptedException e) {
                    e.printStackTrace();
                }
            }
        });

        // Start both threads
        t1.start();
        t2.start();

        // Wait for threads to finish
        try {
            t1.join();
            t2.join();
        }
        catch (InterruptedException e) {
            e.printStackTrace();
        }

        // Print final balance
        System.out.println("Final Balance: "
                           + account.getBalance());
    }
}
 
Output
Deposited: 200, Balance: 1200
Withdrawn: 100, Balance: 1100
Deposited: 200, Balance: 1300
Withdrawn: 100, Balance: 1200
Deposited: 200, Balance: 1400
Withdrawn: 100, Balance: 1300
Final Balance: 1300

Explanation: It demonstrates process synchronization using a bank account with deposit and withdrawal operations. Two threads, one for depositing and one for withdrawing, perform operations on the shared account. The methods deposit() and withdraw() are synchronized to ensure thread safety, preventing race conditions when both threads access the balance simultaneously. This ensures accurate updates to the account balance.

2. Thread Synchronization in Java

Thread Synchronization is used to coordinate and ordering of the execution of the threads in a multi-threaded program. There are two types of thread synchronization are mentioned below:

Example: Java Program to demonstrate thread synchronization for Ticket Booking System

// Java Program to demonstrate thread synchronization for Ticket Booking System
class TicketBooking {
    private int availableTickets = 10; // Shared resource (available tickets)

    // Synchronized method for booking tickets
    public synchronized void bookTicket(int tickets) {
        if (availableTickets >= tickets) {
            availableTickets -= tickets;
            System.out.println("Booked " + tickets + " tickets, Remaining tickets: " + availableTickets);
        } else {
            System.out.println("Not enough tickets available to book " + tickets);
        }
    }

    public int getAvailableTickets() {
        return availableTickets;
    }
}

public class Geeks {
    public static void main(String[] args) {
        TicketBooking booking = new TicketBooking(); // Shared resource

        // Thread 1 to book tickets
        Thread t1 = new Thread(() -> {
            for (int i = 0; i < 2; i++) {
                booking.bookTicket(2); // Trying to book 2 tickets each time
                try {
                    Thread.sleep(50); // Simulate delay
                } catch (InterruptedException e) {
                    e.printStackTrace();
                }
            }
        });

        // Thread 2 to book tickets
        Thread t2 = new Thread(() -> {
            for (int i = 0; i < 2; i++) {
                booking.bookTicket(3); // Trying to book 3 tickets each time
                try {
                    Thread.sleep(40); // Simulate delay
                } catch (InterruptedException e) {
                    e.printStackTrace();
                }
            }
        });

        // Start both threads
        t1.start();
        t2.start();

        // Wait for threads to finish
        try {
            t1.join();
            t2.join();
        } catch (InterruptedException e) {
            e.printStackTrace();
        }

        // Print final remaining tickets
        System.out.println("Final Available Tickets: " + booking.getAvailableTickets());
    }
}
 
Output
Booked 2 tickets, Remaining tickets: 8
Booked 3 tickets, Remaining tickets: 5
Booked 3 tickets, Remaining tickets: 2
Booked 2 tickets, Remaining tickets: 0
Final Available Tickets: 0

Explanation: Here the TicketBooking class contains a synchronized method bookTicket(), which ensures that only one thread can book tickets at a time, preventing race conditions and overbooking. Each thread attempts to book a set number of tickets in a loop, with thread synchronization ensuring that the availableTickets variable is safely accessed and updated. Finally, the program prints the remaining tickets.

Mutual Exclusive

Mutual Exclusive helps keep threads from interfering with one another while sharing data. There are three types of Mutual Exclusive mentioned below:

  • Synchronized method.
  • Synchronized block.
  • Static synchronization.

Example: Below is the implementation of the Java Synchronization

// A Java program to demonstrate working of synchronized.
import java.io.*;
// A Class used to send a message
class Sender {
    public void send(String msg)
    {
        System.out.println("Sending " + msg);  // Changed to print without new line
        try {
            Thread.sleep(100);
        }
        catch (Exception e) {
            System.out.println("Thread  interrupted.");
        }
        System.out.println(msg + "Sent");  // Improved output format
    }
}

// Class for sending a message using Threads
class ThreadedSend extends Thread {
    private String msg;
    Sender sender;

    // Receives a message object and a string message to be sent
    ThreadedSend(String m, Sender obj)
    {
        msg = m;
        sender = obj;
    }

    public void run()
    {
        // Only one thread can send a message at a time.
        synchronized (sender)
        {
            // Synchronizing the send object
            sender.send(msg);
        }
    }
}

// Driver class
class Geeks {
    public static void main(String args[])
    {
        Sender send = new Sender();
        ThreadedSend S1 = new ThreadedSend("Hi ", send);
        ThreadedSend S2 = new ThreadedSend("Bye ", send);

        // Start two threads of ThreadedSend type
        S1.start();
        S2.start();

        // Wait for threads to end
        try {
            S1.join();
            S2.join();
        }
        catch (Exception e) {
            System.out.println("Interrupted");
        }
    }
}
 
Output
Sending Hi 
Hi Sent
Sending Bye 
Bye Sent

Explanation: In the above example, we choose to synchronize the Sender object inside the run() method of the ThreadedSend class. Alternately, we could define the whole send() block as synchronized, producing the same result. Then we don’t have to synchronize the Message object inside the run() method in the ThreadedSend class. 

We do not always have to synchronize a whole method. Sometimes it is preferable to synchronize only part of a method. Java synchronized blocks inside methods make this possible.

Example: Below is the Java program shows the synchronized method using an anonymous class

// Java Pogram to synchronized method by
// using an anonymous class
import java.io.*;

class Test {
    synchronized void test_func(int n)
    {
        // synchronized method
        for (int i = 1; i <= 3; i++) {
            System.out.println(n + i);
            try {
                Thread.sleep(100);
            }
            catch (Exception e) {
                System.out.println(e);
            }
        }
    }
}

// Driver Class
public class Geeks {
    // Main function
    public static void main(String args[])
    {
        // only one object
        final Test O = new Test();

        Thread a = new Thread() {
            public void run() { O.test_func(15); }
        };

        Thread b = new Thread() {
            public void run() { O.test_func(30); }
        };

        a.start();
        b.start();
    }
}
 
Output
16
17
18
31
32
33

Explanation: Here the Test class has a synchronized method test_func() that prints a sequence of numbers with a slight delay, ensuring thread safety when accessed by multiple threads. Two threads are created using anonymous classes, each calling the test_func() method with different values. The synchronized keyword ensures that only one thread can execute the method at a time.

Handling Parallel Execution

In the ever-evolving landscape of software development, efficiency and performance play a crucial role in delivering high-quality applications. One way to achieve parallelism and optimize task execution is through the use of multithreading. In this blog, we’ll explore a Java example that demonstrates parallel task execution using the ExecutorService and CompletableFuture, offering insights into how you can harness the power of concurrency for improved performance.

Understanding the Problem:

Imagine a scenario where you have a list of tasks to be executed, each with a specific order. Traditionally, you might execute these tasks sequentially, leading to potential bottlenecks and increased execution time. However, by leveraging parallelism, you can significantly improve the overall performance of your application.

Let’s consider a sample Java program that models a set of tasks with associated order numbers. The goal is to parallelize the execution of tasks with the same order, optimizing the processing time.

package org.example;

import java.util.*;
import java.util.concurrent.*;
import java.util.function.Consumer;

class Task {
int order;
String description;

Consumer<Task> taskProcessor;

public Task(int order, String description, Consumer<Task> taskProcessor) {
this.order = order;
this.description = description;
this.taskProcessor = taskProcessor;
}
}

public class OrderExecutionExample {
public static void main(String[] args) {
// Sample list of tasks with order numbers
List<Task> tasks = Arrays.asList(
new Task(1, "Task 1",OrderExecutionExample::processTask1),
new Task(2, "Task 2",OrderExecutionExample::processTask2),
new Task(2, "Task 3",OrderExecutionExample::processTask3),
new Task(2, "Task 4",OrderExecutionExample::processTask4),
new Task(3, "Task 5",OrderExecutionExample::processTask5)
);

// Group tasks by order number
Map<Integer, List<Task>> tasksByOrder = new HashMap<>();
for (Task task : tasks) {
tasksByOrder.computeIfAbsent(task.order, k -> new ArrayList<>()).add(task);
}

// Create an ExecutorService for parallel execution
ExecutorService executorService = Executors.newFixedThreadPool(5);

// Process tasks
for (List<Task> orderTasks : tasksByOrder.values()) {
CompletableFuture<Void>[] futures = orderTasks.stream()
.map(task -> CompletableFuture.runAsync(() -> task.taskProcessor.accept(task), executorService))
.toArray(CompletableFuture[]::new);

// Wait for all parallel tasks with the same order to complete
CompletableFuture.allOf(futures).join();
}
System.out.println("done");
// Shutdown the executor
executorService.shutdown();
}

private static void processTask1(Task task) {
System.out.println("Processing Task 1: " + task.description);
try {
Thread.sleep(2000);
} catch (InterruptedException e) {
System.err.println("Thread sleep interrupted: " + e.getMessage());
Thread.currentThread().interrupt();
}
}

private static void processTask2(Task task) {

System.out.println("Processing Task 2: " + task.description);
try {
Thread.sleep(2000);
} catch (InterruptedException e) {
System.err.println("Thread sleep interrupted: " + e.getMessage());
Thread.currentThread().interrupt();
}
}

private static void processTask3(Task task) {

System.out.println("Processing Task 3: " + task.description);
try {
Thread.sleep(2000);
} catch (InterruptedException e) {
System.err.println("Thread sleep interrupted: " + e.getMessage());
Thread.currentThread().interrupt();
}
}

private static void processTask4(Task task) {
System.out.println("Processing Task 4: " + task.description);
try {
Thread.sleep(2000);
} catch (InterruptedException e) {
System.err.println("Thread sleep interrupted: " + e.getMessage());
Thread.currentThread().interrupt();
}
}

private static void processTask5(Task task){
System.out.println("Processing Task 5: " + task.description);
try {
Thread.sleep(2000);
} catch (InterruptedException e) {
System.err.println("Thread sleep interrupted: " + e.getMessage());
Thread.currentThread().interrupt();
}
}

}

The Task Class:

The core of the example lies in the Task class, which serves as a blueprint for representing individual units of work. This class encapsulates essential information about a task, including its order, description, and a taskProcessor. The order attribute defines the sequence in which tasks should be executed, while the description provides a human-readable label. The brilliance of the design lies in the taskProcessor, a Consumer<Task> functional interface, which allows each task to have a distinct processing logic. This design choice promotes modularity and extensibility, enabling the system to adapt seamlessly to various types of tasks with diverse processing requirements.

Task Execution Framework:

The OrderExecutionExample class acts as the orchestrator of the parallel task execution. A sample list of tasks is created, each instantiated with a specific order, description, and a reference to the corresponding task processing method. These tasks are then grouped by their order numbers using a HashMap. This grouping step sets the stage for parallel execution, ensuring that tasks with the same order will be processed concurrently.

Parallel Execution with CompletableFuture:

The real magic begins with the creation of an ExecutorService, specifically a FixedThreadPool with a capacity of 5 threads. This pool will manage the parallel execution of tasks. The code then iterates through the grouped tasks, creating an array of CompletableFuture<Void> objects, each representing the asynchronous execution of a task. The runAsync method is used to execute the task processor function concurrently.

Once the array of CompletableFuture objects is created, CompletableFuture.allOf(futures).join() is employed to wait for all parallel tasks with the same order to complete. This ensures that the subsequent tasks with different orders can commence processing without waiting for tasks within the same order to finish.

Thread Sleep Simulation:

To simulate the time-consuming nature of each task, a Thread.sleep(2000) is introduced within each processTaskX method. This is a common scenario in real-world applications where tasks involve computation or I/O operations that may take some time to complete.

The provided Java example beautifully illustrates the implementation of parallel task execution using ExecutorService and CompletableFuture. By leveraging parallelism, developers can harness the computational power of modern hardware, significantly improving the efficiency and responsiveness of their applications. This approach is particularly beneficial when dealing with tasks that can be executed concurrently without dependencies on each other. As you explore parallelism in Java, remember to fine-tune thread pool sizes and handle shared data safely to achieve optimal performance. Incorporating parallel execution principles into your coding arsenal can be a game-changer for creating high-performance, scalable applications.

Functional Interfaces

In Java, interfaces act as blueprints that define the behavior of an object. They specify the methods an object must implement, but they don’t provide the actual implementation of those methods. Functional interfaces are interfaces that declare exactly one abstract method. This single method defines the functionality that can be implemented by a lambda expression or an anonymous class. Functional Interface in Java enables users to implement functional programming in Java. In functional programming, the function is an independent entity. Therefore, Java is an object-oriented programming language i.e everything in java rotates around the java classes and their objects. No function is independently present on its own in java. They are part of classes or interfaces. And to use them we require either the class or the object of the respective class to call that function. The function can do anything a variable is capable to perform like passing a function as a parameter, a function returned by another function, etc. Functions in Python is an example of functional programming. Functional interfaces were introduced in Java 8. A functional interface can contain only one abstract method and it can contain any number of static and default (non-abstract) methods. Abstract methods are methods that do not require implementation during their declaration and must be overridden by the class implementing the interface. Default methods can be directly used in a class implementing the interface as well as can be overridden and redefined. Static methods are required to be called using the name of the interface preceding the method name. These cannot be overridden by the classes implementing the interface. Functional Interface in Java is also called Single Abstract Method (SAM) interface. From Java 8 onwards, to represent the instance of functional interfaces, lambda expressions are used. A functional interface is an interface that contains only one abstract method. It can have any number of default methods, static methods, and abstract methods from the Object class. Functional interfaces are used primarily to enable functional programming techniques in Java, particularly with lambda expressions and method references. Syntax
@FunctionalInterface
public interface MyFunctionalInterface {
    // Abstract method
    void myMethod();

    // Default methods (optional)
    default void defaultMethod() {
        // method implementation
    }

    // Static methods (optional)
    static void staticMethod() {
        // method implementation
    }

    // Abstract methods from Object class (not counted toward functional interface method count)
    boolean equals(Object obj);
    int hashCode();
    String toString();
}
Java

@FunctionalInterface Annotation

@FunctionalInterface annotation is used to ensure that the functional interface can’t have more than one abstract method. In case more than one abstract methods are present, the compiler flags an ‘Unexpected @FunctionalInterface annotation’ message. However, it is not mandatory to use this annotation. Example


@FunctionalInterface

interface Square {
	int calculate(int x);
}

class Test {
	public static void main(String args[])
	{
		int a = 5;

		// lambda expression to define the calculate method
		Square s = (int x) -> x * x;

		// parameter passed and return type must be
		// same as defined in the prototype
		int ans = s.calculate(a);
		System.out.println(ans);
	}
}
Java
Output
25 
Java

Some Built-in Functional interface in Java

There are many interfaces that are converted into functional interfaces. All these interfaces are annotated with @FunctionalInterface. These interfaces are as follows –
  • Runnable –> This interface only contains the run() method.
  • Comparable –> This interface only contains the compareTo() method.
  • ActionListener –> This interface only contains the actionPerformed() method.
  • Callable –> This interface only contains the call() method.
In Java four main kinds of functional interfaces which can be applied in multiple situations as mentioned below:
  1. Consumer
  2. Predicate
  3. Function
  4. Supplier

1. Consumer

In Java, the Consumer functional interface is a part of the java.util.function package introduced in Java 8. It represents an operation that accepts a single input argument and returns no result. It is meant to be used in scenarios where you need to consume (or accept) some input but don’t need to produce any output. The Consumer interface defines a single method named accept() which takes an argument of a specified type and performs some operation on it. Syntax
@FunctionalInterface
public interface Consumer<T> {
    void accept(T t);
}
Java
Example
import java.util.ArrayList;
import java.util.List;
import java.util.function.Consumer;

public class ConsumerExample {
    public static void main(String[] args) {
        // Creating a list of integers
        List<Integer> numbers = new ArrayList<>();
        numbers.add(1);
        numbers.add(2);
        numbers.add(3);
        numbers.add(4);
        numbers.add(5);

        // Using a Consumer to perform an operation on each element of the list
        Consumer<Integer> consumer = (Integer num) -> {
            System.out.println("Processing number: " + num);
            // Perform any operation here
        };

        // Applying the consumer to each element of the list
        numbers.forEach(consumer);
    }
}
Java
Output
Processing number: 1
Processing number: 2
Processing number: 3
Processing number: 4
Processing number: 5
Java

2. Predicate

In Java, the Predicate functional interface is a part of the java.util.function package introduced in Java 8. It represents a predicate (boolean-valued function) of one argument. It is often used when you need to evaluate a condition on an object and return a boolean value indicating whether the condition is true or false. The Predicate interface defines a single method named test() which takes an argument of a specified type and returns a boolean result. Syntax
@FunctionalInterface
public interface Predicate<T> {
    boolean test(T t);
}
Java
Example
import java.util.function.Predicate;

public class PredicateExample {
    public static void main(String[] args) {
        // Creating a Predicate to check if a given number is even
        Predicate<Integer> isEven = num -> num % 2 == 0;

        // Testing the Predicate with some numbers
        System.out.println("Is 5 even? " + isEven.test(5));   // false
        System.out.println("Is 10 even? " + isEven.test(10)); // true
    }
}
Java
Output
Is 5 even? false
Is 10 even? true
Java

3. Function

In Java, the Function interface is a functional interface introduced in Java 8 as part of the java.util.function package. It represents a function that accepts one argument and produces a result. This interface typically transforms the input value into an output value. The Function interface has one abstract method called apply, which takes an argument of a certain type and returns a result of another type. Syntax
@FunctionalInterface
public interface Function<T, R> {
    R apply(T t);
}
Java
Example
import java.util.function.Function;

public class FunctionExample {
    public static void main(String[] args) {
        // Example 1: Convert String to Integer
        Function<String, Integer> stringToInteger = s -> Integer.parseInt(s);
        Integer intValue = stringToInteger.apply("123");
        System.out.println("Converted Integer: " + intValue);

        // Example 2: Convert Integer to String
        Function<Integer, String> integerToString = i -> String.valueOf(i);
        String stringValue = integerToString.apply(456);
        System.out.println("Converted String: " + stringValue);

        // Example 3: Composing functions
        Function<String, Integer> stringLength = s -> s.length();
        Function<Integer, String> addPrefix = i -> "Length is: " + i;

        // Compose functions stringToInteger and addPrefix
        Function<String, String> composedFunction = stringToInteger.andThen(addPrefix);
        String result = composedFunction.apply("Hello");
        System.out.println("Result after composing functions: " + result);
    }
}
Java
Output
Converted Integer: 123
Converted String: 456
Result after composing functions: Length is: 5
Java

4. Supplier

In Java, the Supplier functional interface is part of the java.util.function package introduced in Java 8. It represents a supplier of results. It doesn’t take any argument but produces a result of a given type. The Supplier interface has one abstract method called get, which doesn’t take any arguments but returns a result of the specified type. Syntax
@FunctionalInterface
public interface Supplier<T> {
    T get();
}
Java
Example
import java.util.function.Supplier;

public class SupplierExample {
    public static void main(String[] args) {
        // Example 1: Supplier for generating random numbers
        Supplier<Double> randomSupplier = Math::random;
        System.out.println("Random number: " + randomSupplier.get());

        // Example 2: Supplier for generating current timestamp
        Supplier<Long> currentTimeSupplier = System::currentTimeMillis;
        System.out.println("Current timestamp: " + currentTimeSupplier.get());

        // Example 3: Supplier for providing a constant value
        Supplier<String> greetingSupplier = () -> "Hello, world!";
        System.out.println("Greeting: " + greetingSupplier.get());
    }
}
Java
Output
Random number: 0.6552812300200777
Current timestamp: 1647768122286
Greeting: Hello, world!
Java

Advantages of Functional Interface in Java:

  • Flexibility: Functional interfaces offer flexibility by allowing methods to be passed as parameters, facilitating the implementation of various behaviors without the need for multiple interfaces.
  • Conciseness: They promote concise code by enabling the use of lambda expressions, reducing verbosity and enhancing readability.
  • Parallelism: Functional interfaces can facilitate parallelism and concurrency, as they often represent operations that can be easily parallelized, such as mapping or reducing functions.
  • Composition: They support function composition, enabling the creation of complex behaviors by combining simpler functions, leading to more modular and maintainable code.
  • Functional Programming Paradigm: They align with the principles of functional programming, promoting immutability, referential transparency, and other beneficial characteristics.

Disadvantages of Functional Interface in Java:

  • Learning Curve: For developers unfamiliar with functional programming concepts, understanding and utilizing functional interfaces effectively can pose a steep learning curve.
  • Complexity: In some cases, the use of functional interfaces and lambda expressions can introduce complexity, especially in scenarios where there is a mix of imperative and functional programming styles within the same codebase.
  • Performance Overhead: While modern JVMs optimize the performance of lambda expressions and functional interfaces, there may still be a slight performance overhead compared to traditional imperative code in certain scenarios.
  • Debugging Challenges: Debugging code involving complex functional interfaces and lambda expressions can be challenging, as it may require understanding the behavior of higher-order functions and closures.
  • Compatibility: Maintaining compatibility with older versions of Java or other programming languages that do not support functional interfaces may be a concern, particularly when integrating with legacy systems or libraries.
functional interfaces in Java represent a significant advancement in the language’s capabilities, enabling developers to embrace functional programming principles more effectively. They facilitate the creation of concise and expressive code through lambda expressions and method references, promoting readability and maintainability. While there may be a learning curve for those new to functional programming, the benefits of functional interfaces, including flexibility, composability, and improved parallelism, make them a valuable addition to Java’s toolkit. As Java continues to evolve, functional interfaces will remain a key feature for developers seeking to write efficient and elegant code.

Stream API for Data Manipulation

Java, a versatile and widely used programming language, empowers developers with tools to efficiently handle data. Among these tools, Java’s Stream API stands out as a powerful mechanism for data manipulation and processing within collections. In this comprehensive guide, we’ll embark on a journey through the fascinating world of Java Streams, exploring their intricacies, advanced features, and best practices.

Understanding Streams

Streams, introduced in Java 8 and enhanced in subsequent versions, are a revolutionary addition to the language’s toolkit. They represent a sequence of elements that you can process sequentially or in parallel, providing a concise and functional approach to data manipulation. Streams allow you to perform a series of operations on data, such as filtering, mapping, sorting, and more, in a fluent and expressive style.

Basic Stream Operations

Let’s start by delving into some fundamental Stream operations:

Filtering

Filtering enables you to select elements from a collection based on a specified condition. Here’s an example:

In this example, we filter and collect names longer than four characters.

Mapping

Mapping transforms elements from one form to another using a provided function. Here’s a mapping example:

In this case, we map the words to their respective lengths.

Sorting

You can sort elements using the sorted operation. Both natural and custom sorting criteria can be specified:

This sorts the numbers in ascending order.

Reducing

The reduce operation allows you to reduce a collection to a single value, such as finding the sum or maximum value:

Here, we calculate the sum and find the maximum value.

Advanced Stream Operations

Limiting

The limit operation restricts the number of elements in a Stream:

This selects the first five numbers.

Grouping and Summarizing

Streams are invaluable for grouping and summarizing data:

Here, we group people by age and count people of each age.

Parallel Stream Processing

Java Streams also support parallel processing, utilizing multi-core processors for enhanced performance. To use parallel Streams, simply call the parallelStream method:

This example filters and sums even numbers in parallel.

Best Practices and Considerations

When working with Streams, here are some best practices and considerations to keep in mind:

  • Use Streams for complex data manipulations and filtering to make your code more concise and expressive.
  • Be cautious with parallel Streams; they are not always faster due to the overhead of parallelization. Benchmarking is often necessary.
  • Consider immutability when using Streams to avoid side effects and ensure thread safety.
  • Streams are lazy by nature, so they only execute operations when necessary, optimizing performance.

Java Streams provide a powerful and expressive way to manipulate data in collections. Whether you’re working with lists, sets, or even custom data sources, Streams can simplify your code and make it more readable. This guide has covered the basics and advanced use cases of Stream operations, as well as parallel processing. Mastering Streams will significantly enhance your Java programming skills and help you write efficient, elegant, and maintainable code.

Lambda Expressions for Concise Code

Lambda expressions in Java, introduced in Java SE 8, represent instances of functional interfaces (interfaces with a single abstract method). They provide a concise way to express instances of single-method interfaces using a block of code.

Functionalities of Lambda Expression

Lambda Expressions implement the only abstract function and therefore implement functional interfaces lambda expressions are added in Java 8 and provide the below functionalities.

  • Functional Interfaces: A functional interface is an interface that contains only one abstract method.
  • Code as Data: Treat functionality as a method argument.
  • Class Independence: Create functions without defining a class.
  • Pass and Execute: Pass lambda expressions as objects and execute on demand.

Example: Here, the below Java program demonstrates how lambda expression can be used to implement a user-defined functional interface.

// Java program to demonstrate lambda expressions
// to implement a user defined functional interface.

// A sample functional interface (An interface with
// single abstract method
interface FuncInterface
{
    // An abstract function
    void abstractFun(int x);

    // A non-abstract (or default) function
    default void normalFun()
    {
       System.out.println("Hello");
    }
}

class Test
{
    public static void main(String args[])
    {
        // lambda expression to implement above
        // functional interface. This interface
        // by default implements abstractFun()
        FuncInterface fobj = (int x)->System.out.println(2*x);

        // This calls above lambda expression and prints 10.
        fobj.abstractFun(5);
    }
}
Output
10

Structure of Lambda Expression

Below diagram demonstrates the structure of Lambda Expression

lambda expressionSyntax

Java Lambda Expression has the following syntax:

(argument list) -> { body of the expression }

Components:

  • Argument List: Parameters for the lambda expression
  • Arrow Token (->): Separates the parameter list and the body
  • Body: Logic to be executed.

Lambda Expression Parameters

There are three Lambda Expression Parameters are mentioned below:

  1. Zero Parameter
  2. Single Parameter
  3. Multiple Parameters

1. Lambda Expression with Zero parameter 

() -> System.out.println(“Zero parameter lambda”);

Example: Here, the below Java program demonstrates a Lambda expression with zero parameter.

// Java program to demonstrates Lambda expression with zero parameter

@FunctionalInterface
interface ZeroParameter {
    void display();
}

public class Geeks {
    public static void main(String[] args)
    {
        // Lambda expression with zero parameters
        ZeroParameter zeroParamLambda = ()
            -> System.out.println(
                "This is a zero-parameter lambda expression!");

        // Invoke the method
        zeroParamLambda.display();
    }
}
Output
This is a zero-parameter lambda expression!

2. Lambda Expression with Single parameter

(p) -> System.out.println(“One parameter: ” + p);

It is not mandatory to use parentheses if the type of that variable can be inferred from the context

Example: Here, the below Java program demonstrates the use of lambda expression in two different scenarios with an ArrayList.

  • We are using lambda expression to iterate through and print all elements of an ArrayList.
  • We are using lambda expression with a condition to selectively print even number of elements from an ArrayList.
// A Java program to demonstrate simple lambda expressions

import java.util.ArrayList;
class Test {
    public static void main(String args[])
    {
        // Creating an ArrayList with elements
        // {1, 2, 3, 4}
        ArrayList<Integer> arrL = new ArrayList<Integer>();
        arrL.add(1);
        arrL.add(2);
        arrL.add(3);
        arrL.add(4);

        // Using lambda expression to print all elements
        // of arrL

        System.out.println("Elements of the ArrayList : ");
        arrL.forEach(n -> System.out.println(n));

        // Using lambda expression to print even elements
        // of arrL
        System.out.println(
            "Even elements of the ArrayList : ");
        arrL.forEach(n -> {
            if (n % 2 == 0)
                System.out.println(n);
        });
    }
}
Output
Elements of the ArrayList : 
1
2
3
4
Even elements of the ArrayList : 
2
4

Note: Lambda expressions can only be used to implement functional interfaces. In the above example also, the lambda expression implements Consumer Functional Interface.

3. Lambda Expression with Multiple parameters

(p1, p2) -> System.out.println(“Multiple parameters: ” + p1 + “, ” + p2);

Example: Here, the below Java program demonstrates the use of lambda expression to implement functional interface to perform basic arithmetic operations.

@FunctionalInterface
interface Functional {
    int operation(int a, int b);
}

public class Test {

    public static void main(String[] args) {
        // Using lambda expressions to define the operations
        Functional add = (a, b) -> a + b;
        Functional multiply = (a, b) -> a * b;

        // Using the operations
        System.out.println(add.operation(6, 3));  // Output: 9
        System.out.println(multiply.operation(4, 5));  // Output: 20
    }
}
Output
9
20

Every Java Programmer is familiar with NullPointerException. It can crash your code. And it is very hard to avoid it without using too many null checks. So, to overcome this, Java 8 has introduced a new class Optional in java.util package. It can help in writing a neat code without using too many null checks. By using Optional, we can specify alternate values to return or alternate code to run. This makes the code more readable because the facts which were hidden are now visible to the developer.

// Java program without Optional Class

public class OptionalDemo {
    public static void main(String[] args)
    {
        String[] words = new String[10];
        String word = words[5].toLowerCase();
        System.out.print(word);
    }
}

Output:

Exception in thread "main" java.lang.NullPointerException

To avoid abnormal termination, we use the Optional class. In the following example, we are using Optional. So, our program can execute without crashing.

The above program using Optional Class

// Java program with Optional Class

import java.util.Optional;

// Driver Class
public class OptionalDemo {
      // Main Method
    public static void main(String[] args)
    {
        String[] words = new String[10];
        
          Optional<String> checkNull = Optional.ofNullable(words[5]);
        
          if (checkNull.isPresent()) {
            String word = words[5].toLowerCase();
            System.out.print(word);
        }
        else
            System.out.println("word is null");
    }
}
Output
word is null

Optional is a container object which may or may not contain a non-null value. You must import java.util package to use this class. If a value is present, isPresent() will return true and get() will return the value. Additional methods that depend on the presence or absence of a contained value are provided, such as orElse() which returns a default value if the value is not present, and ifPresent() which executes a block of code if the value is present. This is a value-based class, i.e their instances are :

  • Final and immutable (though may contain references to mutable objects).
  • Considered equal solely based on equals(), not based on reference equality(==).
  • Do not have accessible constructors.

Static Methods: Static methods are the methods in Java that can be called without creating an object of the class. They are referenced by the class name itself or reference to the object of that class.

Syntax : 

public static void test(String name)
{
 // code to be executed....
}

// Must have static modifier in their declaration.
// Return type can be int, float, String or user-defined data type.

Important Points: Since Static methods belong to the class, they can be called to without creating the object of the class. Below given are some important points regarding Static Methods :

  • Static method(s) are associated with the class in which they reside i.e. they can be called even without creating an instance of the class.
  • They are designed with the aim to be shared among all objects created from the same class.
  • Static methods can not be overridden. But can be overloaded since they are resolved using static binding by the compiler at compile time.

The following table shows the list of Static Methods provided by Optional Class :

Instance Methods: Instance methods are methods that require an object of its class to be created before it can be called. To invoke an instance method, we have to create an Object of the class within which it is defined.

Syntax : 

public void test(String name)
{
 // code to be executed....
}
// Return type can be int, float String or user defined data type.

Important Points: Instance Methods can be called within the same class in which they reside or from the different classes defined either in the same package or other packages depending on the access type provided to the desired instance method. Below given are some important points regarding Instance Methods :

  • Instance method(s) belong to the Object of the class, not to the class i.e. they can be called after creating the Object of the class.
  • Every individual object created from the class has its own copy of the instance method(s) of that class.
  • They can be overridden since they are resolved using dynamic binding at run time.

The following table shows the list of Instance Methods provided by the Optional Class :

Concrete Methods: A concrete method means, the method has a complete definition but can be overridden in the inherited class. If we make this method final, then it can not be overridden. Declaring method or class “final” means its implementation is complete. It is compulsory to override abstract methods. Concrete Methods can be overridden in the inherited classes if they are not final. The following table shows the list of Concrete Methods provided by the Optional Class :

Below given are some examples :

Example 1 :

// Java program to illustrate
// optional class methods

import java.util.Optional;

class GFG {

    // Driver code
    public static void main(String[] args)
    {

        // creating a string array
        String[] str = new String[5];

        // Setting value for 2nd index
        str[2] = "Test Classes are coming soon";

        // It returns an empty instance of Optional class
        Optional<String> empty = Optional.empty();
        System.out.println(empty);

        // It returns a non-empty Optional
        Optional<String> value = Optional.of(str[2]);
        System.out.println(value);
    }
}
Output
Optional.empty
Optional[Test Classes are coming soon]

Example 2 :

// Java program to illustrate
// optional class methods

import java.util.Optional;

class GFG {

    // Driver code
    public static void main(String[] args)
    {

        // creating a string array
        String[] str = new String[5];

        // Setting value for 2nd index
        str[2] = "Test Classes are coming soon";

        // It returns a non-empty Optional
        Optional<String> value = Optional.of(str[2]);

        // It returns value of an Optional.
        // If value is not present, it throws
        // an NoSuchElementException
        System.out.println(value.get());

        // It returns hashCode of the value
        System.out.println(value.hashCode());

        // It returns true if value is present,
        // otherwise false
        System.out.println(value.isPresent());
    }
}
Output
Test Classes are coming soon
1967487235
true

Streams and Functional Programming

Java 8 gave us the Stream API, a lazy-sequential data pipeline of functional blocks. It isn’t implemented as a data structure or by changing its elements directly. It’s just a dumb pipe providing the scaffolding to operate on, making it really a smart pipe.

Basic Concept

The basic concept behind streams is simple: We got a data source, perform zero or more intermediate operations, and get a result.
“Flow of Stream operations”
The parts of a stream can be separated into three groups:
  • Obtaining the stream (source)
  • Doing the work (intermediate operations)
  • Getting a result (terminal operation)

Obtaining the stream

The first step is obtaining a stream. Many data structures of the JDK already support providing a stream:
  • java.util.Collection#stream()
  • java.util.Arrays#stream(T[] array)
  • java.nio.file.Files#list(Path dir)
  • java.nio.file.Files#lines(Path path)
Or we can create one by using java.util.stream.Stream#of(T... values) with our values. The class java.util.StreamSupport also provides a multitude of static methods for creating streams.

Doing the work

The java.util.Stream interface provides a lot of different operations. Filtering
  • filter(Predicate<? super T> predicate)
  • distinct()
Mapping
  • map(Function<? super T, ? extends R> mapper)
  • mapToInt(ToIntFunction<? super T> mapper)
  • mapToLong(ToLongFunction<? super T> mapper)
  • mapToDouble(ToDoubleFunction<? super T> mapper)
  • flatMap(Function<? super T, ? extends Stream<? extends R>> mapper)
  • flatMapToInt(Function<? super T, ? extends IntStream> mapper)
  • flatMapToLong(Function<? super T, ? extends LongStream> mapper)
  • flatMapToDouble(Function<? super T, ? extends DOubleStream> mapper)
Sizing/sorting
  • skip(long n)
  • limit(long maxSize)
  • sorted()
  • sorted(Comparator<? super T> comparator)
Debugging
  • peek(Consumer<? super T> action)

Getting a result

Performing operations on the Stream elements is great. But at some point, we want to get a result back from our data pipeline. Terminal operations are initiating the lazy pipeline to do the actual work and don’t return a new stream. Aggregate to new collection/array
  • R collect(Collector<? super T, A, R> collector)
  • R collect(Supplier<R> supplier, BiConsumer<R, ? super T> accumulator, BiConsumer<R, R> combiner)
  • Object[] toArray()
  • A[] toArray(IntFunction<A[]> generator)
Reduce to a single value
  • T reduce(T identity, BinaryOperator<T> accumulator)
  • Optional<T> reduce(BinaryOperator<T> accumulator)
  • U reduce(U identity, BiFunction<U, ? super T, U> accumulator, BinaryOperator<U> combiner)
Calculations
  • Optional<T> min(Comparator<? super T> comparator)
  • Optional<T> max(Comparator<? super T> comparator)
  • long count()
Matching
  • boolean allMatch(Predicate<? super T> predicate)
  • boolean anyMatch(Predicate<? super T> predicate)
  • boolean noneMatch(Predicate<? super T> predicate)
Finding
  • Optional<T> findAny()
  • Optional<T> findFirst()
Consuming
  • void forEach(Consumer<? super T> action)
  • void forEachOrdered(Consumer<? super T> action)

Stream Characteristics

Streams aren’t just glorified loops. Sure, we can express any stream with a loop — and most loops with streams. But this doesn’t mean they’re equal or one is always better than the other.

Laziness

The most significant advantage of streams over loops is laziness. Until we call a terminal operation on a stream, no work is done. We can build up our processing pipeline over time and only run it at the exact time we want it to. And not just the building of the pipeline is lazy. Most intermediate operations are lazy, too. Elements are only consumed as they’re needed.

(Mostly) stateless

One of the main pillars of functional programming is an immutable state. Most intermediate operations are stateless, except for distinct()sorted(...)limit(...), and skip(...). Even though Java allows the building of stateful lambdas, we should always strive to design them to be stateless. Any state can have severe impacts on safety and performance and might introduce unintended side effects.

Optimizations included

Thanks to being (mostly) stateless, streams can optimize themselves quite efficiently. Stateless intermediate operations can be fused together to a combined consumer. Redundant operations might be removed. And some pipeline paths might be short-circuited. The JVM will optimize traditional loops, too. But streams are an easier target due to their multioperation design and are mostly stateless.

Non-reusable

Being just a dumb pipeline, streams can’t be reused. But they don’t change the original data source — we can always create another stream from the source.

Less boilerplate

Streams are often easier to read and comprehend. This is a simple data-processing example with a for loop:
java
List<Album> albums = ...;
List<String> result = new ArrayList<>();

for (Album album : albums) {

    if (album.getYear() != 1999) {
        continue;
    }

    if (album.getGenre() != Genre.ALTERNATIVE) {
        continue;
    }

    result.add(album.getName());

    if (result.size() == 5) {
        break
    }
}

Collections.sort(result);
This code is equivalent to:
java
List<String> result = 
    albums.stream()
          .filter(album -> album.getYear == 1999)
          .filter(album -> album.getGenre() == Genre.ALTERNATIVE)
          .limit(5)
          .map(Album::getName)
          .sorted()
          .collect(Collectors.toList());
We have a shorter code block, clearer operations, no loop boilerplate, and no extra temporary variables. All nicely packaged in a fluent API. This way, our code reflects the what, and we no longer need to care about the actual iteration process, the how.

Easy parallelization

Concurrency is hard to do right and easy to do wrong. Streams support parallel execution (forkJoin) and remove much of the overhead if we’re doing it ourselves. A stream can be parallelized by calling the intermediate operation parallel() and turned back to sequential by calling sequential(). But not every stream pipeline is a good match for parallel processing. The source must be big enough and the operations costly enough to justify the overhead of multiple threads. Context switches are expensive. We shouldn’t parallelize a stream just because we can.

Primitive handling

Just like with functional interfaces, streams have specialized classes for dealing with primitives to avoid autoboxing/unboxing:
  • java.util.stream.IntStream
  • java.util.stream.LongStream
  • java.util.stream.DoubleStream

Best Practices and Caveats

Smaller operations

Lambdas can be simple one-liners or huge code blocks if wrapped in curly braces. To retain simplicity and conciseness, we should restrict ourselves to these two use cases for operations:
  • One-line expressions e.g., .filter(album -> album.getYear() > 4)
  • Method references e.g., filter(this::myFilterCriteria)
By using method references, we can have more complex operations, reuse operational logic, and even unit test it more easily.

Method references

Not only simplicity and conciseness are affected by using method references. There are also implications on the bytecode level. The bytecode between a lambda and a method reference differs slightly — with the method reference generating less. A lambda might be translated into an anonymous class calling the body, creating more code than needed. Also, by using method references, we lose the visual noise of the lambda:
java
source.stream()
      .map(s -> s.length())
      .collect(Collectors.toList());

// VS.

source.stream()
      .map(String::length)
      .collect(Collectors.toList());

Cast and Type Checks

Don’t forget that Class<T> is an object, too, providing many helpful methods:
java
source.stream()
      .filter(String.class::isInstance)
      .map(String.class::cast)
      .collect(Collectors.toList());

Return a value or check for null

Intermediate operations should either return a value or handle null in the next operation. Adding a simple .filter(Objects::nonNull) might be enough to ensure no NPEs.

Code formatting

By putting each pipeline step into a new line, we can improve readability:
java
List<String> result = albums.stream().filter(album -> album.getReleaseYear == 1999)
    .filter(album -> album.getGenre() == Genre.ALTERNATIVE).limit(5)
    .map(Album::getName).sorted().collect(Collectors.toList());

// VS.

List<String> result = 
    albums.stream()
          .filter(album -> album.getReleaseYear == 1999)
          .filter(album -> album.getGenre() == Genre.ALTERNATIVE)
          .limit(5)
          .map(Album::getName)
          .sorted()
          .collect(Collectors.toList());
It also allows us to set breakpoints at the correct pipeline step easier.

Not every Iteration is a stream

As written before, we shouldn’t replace every loop. Just because it iterates, doesn’t make it a valid target for stream-based processing. Often a traditional loop might be a better choice than using forEach(...) on a stream.

Effectively final

We can access variables outside of intermediate operations, as long as they are in scope and effectively final. This means it’s not allowed to change after initialization. But doesn’t need an explicit final modifier. And by just re-assigning to a new variable we can make it effectively final:
java
String nonFinal = null;
nonFinal = "changed value makes it non-final";

String thisIsEffectivelyFinalAgain = nonFinal;
Sometimes this restriction seems cumbersome, and we can change the state of effectively final objects, as long as the variable is final. But doing so undermines the concept of immutability and introduces unintended side effects.

Checked Exceptions

Streams and Exceptions are a subject that warrants their own article(s), but I’ll try to summarize them. This code won’t compile:
java
List<Class> classes = 
    Stream.of("java.lang.Object",
              "java.lang.Integer",
              "java.lang.String")
          .map(Class::forName)
          .collect(Collectors.toList());
The method Class.forName(String className) throws a checked exception, a ClassNotFoundException, and requires a try-catch, making the code unbearable to read:
java
List<Class> classes =
    Stream.of("java.lang.Object",
              "java.lang.Integer",
              "java.lang.String")
          .map(className -> {
            try {
                return Class.forName(className);
            }
            catch (ClassNotFoundException e) {
                // Ignore error
                return null;
            }
        })
        // additional filter step required, to deal with null
        .filter(Objects::nonNull)
        .collect(Collectors.toList());
By refactoring the className conversion to a dedicated method, we can retail the simplicity of the stream:
java
Class toClass(String className) {
    try {
        return Class.forName(className);
    }
    catch (ClassNotFoundException e) {
        return null;
    }
}

List<Class> classes =
    Stream.of("java.lang.Object",
              "java.lang.Integer",
              "java.lang.String")
          .map(this::toClass)
          .filter(Objects::nonNull)
          .collect(Collectors.toList());
We still need to handle possible null values, but the checked exception isn’t visible in the stream code. Another solution for dealing with checked exceptions is wrapping the intermediate operations in consumers/functions etc. that catch the checked exceptions and rethrowing them as unchecked. But, in my opinion, that’s more like an ugly hack than a valid solution. If an operation throws a checked exception, we should refactor it to a method and handle its exception accordingly.

Unchecked Exceptions

Even if we handle all checked exceptions, our streams can still blow up thanks to unchecked exceptions. There’s not a one-size-fits-all solution for preventing exceptions, just as there’s not in any other code. Developer discipline can greatly reduce the risk. Use small, well-defined operations with enough checks and validation. This way we can at least minimize the risk.

Debugging

Streams can be debugged as any other fluent call. If we have a single operation in a line, a breakpoint will stop accordingly. But the creation of anonymous classes for lambdas can result in a really confusing stack trace. During development, we could also utilize the intermediate operationpeek(Consumer<? super T> action) to intercept an element. The operation is mainly for debugging purposes and shouldn’t be used in the stream’s final form. IntelliJ provides a visual debugger.

Order of operations

Think of a simple stream:
java
Stream.of("ananas", "oranges", "apple", "pear", "banana")
      .map(String::toUpperCase)       // 1. Process
      .sorted(String::compareTo)      // 2. Sort
      .filter(s -> s.startsWith("A")) // 3. Filter
      .forEach(System.out::println);
This code will run map five times, sorted eight times, filter five times, and forEach two times. This means a total of 20 operations to output two values. If we reorder the pipeline parts, we can reduce the total operations count significantly without changing the actual outcome:
java
Stream.of("ananas", "oranges", "apple", "pear", "banana")
      .filter(s -> s.startsWith("a")) // 1. Filter first
      .map(String::toUpperCase)       // 2. Process
      .sorted(String::compareTo)      // 3. Sort
      .forEach(System.out::println);
By filtering first, we’re going to restrict the other operations to a minimum: filter five times, map two times, sort one time, and forEach two times, which saves us 10 operations in total.

Default and Static Methods in Interfaces

Default methods enable you to add new functionality to the interfaces of your libraries and ensure binary compatibility with code written for older versions of those interfaces. A static method is a method that is associated with the class in which it is defined rather than with any object. Every instance of the class shares its static methods. Static method in interface are part of the interface class can’t implement or override it whereas class can override the default method.
Sr. No. Key Static Interface Method Default Method
1 Basic It is a static method which belongs to the interface only. We can write implementation of this method in interface itself It is a method with default keyword and class can override this method
2 Method Invocation Static method can invoke only on  interface class not on class. It can be invoked on interface as well as class
3 Method Name Interface and implementing class , both can have static method with the same name without overriding each other. We can override the default method in implementing class
4. Use Case It can be used as a utility method It can be used to provide common functionality in all implementing classes

Example of Default and Static method in interface

public interface DefaultStaticExampleInterface {
   default void show() {
      System.out.println("In Java 8- default method - DefaultStaticExampleInterface");
   }
   static void display() {
      System.out.println("In DefaultStaticExampleInterface I");
   }
}
public class DefaultStaticExampleClass implements DefaultStaticExampleInterface {
}
public class Main {
   static void main(String args[]) {
      // Call interface static method on Interface
      DefaultStaticExampleInterface.display();
      DefaultStaticExampleClass defaultStaticExampleClass = new DefaultStaticExampleClass();
     
      // Call default method on Class
      defaultStaticExampleClass.show();
   }
}

Connecting to Databases

Before Establishing a JDBC Connection in Java (the front end i.e. your Java Program and the back end i.e. the database) we should learn what precisely a JDBC is and why it came into existence. Now let us discuss what exactly JDBC stands for and will ease out with the help of real-life illustration to get it working.

What is JDBC?

JDBC stands for Java Database Connectivity. JDBC is a Standard API that enables Java applications to interact with databases like (MYSQL, PostgreSQL, etc). This API consists of classes and interfaces written in Java, In other words, we can also say that JDBC acts as a bridge between your Java application(frontend) and the database(backend), allowing you to send and retrieve data between the two systems.

The diagram below demonstrates the workings of JDBC by co-relating its steps to real-world examples.

Establishing-JDBC-Connection-in-Java

Steps to Connect Java Applications with Database

Below are the steps that explains how to connect to Database in Java:

  • Step 1: Import the Packages
  • Step 2: Load the drivers using the forName() method
  • Step 3: Register the drivers using DriverManager 
  • Step 4: Establish a connection using the Connection class object
  • Step 5: Create a statement
  • Step 6: Execute the query
  • Step 7: Close the connections

Java Database Connectivity

Establishing-JDBC-Connection-in-Java

Let us discuss these steps in brief before implementing by writing suitable code to illustrate connectivity steps for JDBC.

Step 1: Import the Packages

First, we need to import the packages.

Step 2: Loading the drivers

In order to begin with, you first need to load the driver or register it before using it in the program. Registration is to be done once in your program. You can register a driver in one of two ways mentioned below as follows:

Class.forName()

Here we load the driver’s class file into memory at the runtime. No need of using new or create objects. The following example uses Class.forName() to load the Oracle driver as shown below as follows:

Class.forName(“oracle.jdbc.driver.OracleDriver”);

DriverManager.registerDriver()

DriverManager is a Java inbuilt class with a static member register. Here we call the constructor of the driver class at compile time. The following example uses DriverManager.registerDriver()to register the Oracle driver as shown below:

DriverManager.registerDriver(new oracle.jdbc.driver.OracleDriver())

 Step 3: Establish a connection using the Connection class object

After loading the driver, establish connections as shown below as follows:

Connection con = DriverManager.getConnection(url,user,password)

  • user: Username from which your SQL command prompt can be accessed.
  • password: password from which the SQL command prompt can be accessed.
  • con: It is a reference to the Connection interface.
  • Url: Uniform Resource Locator which is created as shown below:

String url = “ jdbc:oracle:thin:@localhost:1521:xe”

Where oracle is the database used, thin is the driver used, @localhost is the IP Address where a database is stored, 1521 is the port number and xe is the service provider. All 3 parameters above are of String type and are to be declared by the programmer before calling the function. Use of this can be referred to form the final code.

Step 4: Create a statement

Once a connection is established you can interact with the database. The JDBCStatement, CallableStatement, and PreparedStatement interfaces define the methods that enable you to send SQL commands and receive data from your database.
Use of JDBC Statement is as follows:

Statement st = con.createStatement();

Note: Here, con is a reference to Connection interface used in previous step.

Step 5: Execute the query

Now comes the most important part i.e executing the query. The query here is an SQL Query. Now we know we can have multiple types of queries. Some of them are as follows:

  • The query for updating/inserting a table in a database.
  • The query for retrieving data.

The executeQuery() method of the Statement interface is used to execute queries of retrieving values from the database. This method returns the object of ResultSet that can be used to get all the records of a table.
The executeUpdate(sql query) method of the Statement interface is used to execute queries of updating/inserting.

Pseudo Code:

int m = st.executeUpdate(sql);

if (m==1)

System.out.println(“inserted successfully : “+sql);

else

System.out.println(“insertion failed”);
on

Example: The below Java program demonstrates how to connect to a MYSQL database, execute a Query, retrieve data and display it.

Note: Here sql is SQL query of the type String.


// This code is for establishing connection with MySQL
// database and retrieving data
// from db Java Database connectivity

/*
 *1. import --->java.sql
 *2. load and register the driver ---> com.jdbc.
 *3. create connection
 *4. create a statement
 *5. execute the query
 *6. process the results
 *7. close
 */

import java.sql.*;

class Geeks {
    public static void main(String[] args) throws Exception {
        String url = "jdbc:mysql://localhost:3306/database_name"; // Database details
        String username = "rootgfg"; // MySQL credentials
        String password = "gfg123";
        String query = "select * from students"; // Query to be run

        // Load and register the driver
        Class.forName("com.mysql.cj.jdbc.Driver");

        // Establish connection
        Connection con = DriverManager.getConnection(url, username, password);
        System.out.println("Connection Established successfully");

        // Create a statement
        Statement st = con.createStatement();

        // Execute the query
        ResultSet rs = st.executeQuery(query);

        // Process the results
        while (rs.next()) {
            String name = rs.getString("name"); // Retrieve name from db
            System.out.println(name); // Print result on console
        }

        // Close the statement and connection
        st.close();
        con.close();
        System.out.println("Connection Closed....");
    }
}
 

Output:

Console Output

Step 6: Closing the Connections

So, finally we have sent the data to the specified location and now we are on the verge of completing our task. By closing the connection, objects of Statement and ResultSet will be closed automatically. The close() method of the Connection interface is used to close the connection. It is shown below as follows:

con.close();

Example: The below Java program demonstrates how to establish a JBDC Connection with an Oracle database.


// Java Program to Establish Connection 
// in JDBC with Oracle Database

// Importing database
import java.sql.*;
// Importing required classes
import java.util.*;

// Main class
class Main {
    public static void main(String a[]) {
       
        String url = "jdbc:oracle:thin:@localhost:1521:xe"; // Database details

        // Username and password to access DB
        String user = "system";
        String pass = "12345";

        // Entering the data
        Scanner k = new Scanner(System.in);
        System.out.println("Enter name:");
        String name = k.next();
        System.out.println("Enter roll no:");
        int roll = k.nextInt();
        System.out.println("Enter class:");
        String cls = k.next();

        // Inserting data using SQL query
        String sql = "insert into student1 values('" + name + "'," + roll + ",'" + cls + "')";

        // Connection class object
        Connection con = null;

        try {
            // Registering drivers
            DriverManager.registerDriver(new oracle.jdbc.OracleDriver());

            // Establish connection
            con = DriverManager.getConnection(url, user, pass);

            // Create a statement
            Statement st = con.createStatement();

            // Execute the query
            int m = st.executeUpdate(sql);
            if (m == 1)
                System.out.println("Inserted successfully: " + sql);
            else
                System.out.println("Insertion failed");

            // Close the connection
            con.close();
        } catch (Exception ex) {
            // Handle exceptions
            System.err.println(ex);
        }
    }
}
}
 

Output:

Output

Executing Queries (Select, Insert, Update, Delete)

This JDBC tutorial is going to help you learning how to do basic database operations (CRUD – Create, Retrieve, Update and Delete) using JDBC (Java Database Connectivity) API. These CRUD operations are equivalent to the INSERT, SELECT, UPDATE and DELETE statements in SQL language. Although the target database system is MySQL, but the same technique can be applied for other database systems as well because the query syntax used is standard SQL which is supported by all relational database systems.

We will learn how to do insert, query, update and delete database records by writing code to manage records of a table Users in a MySQL database called SampleDB.

Table of content:

    1. Prerequisites
    2. Creating a sample MySQL database
    3. Understand the principal JDBC interfaces and classes
    4. Connecting to the database
    5. Executing INSERT statement
    6. Executing SELECT statement
    7. Executing UPDATE statement
    8. Executing DELETE statement

1. Prerequisites

To begin, make sure you have the following pieces of software installed on your computer:

    • JDK (download JDK 7).
    • MySQL (download MySQL Community Server 5.6.12). You may also want to download MySQL Workbench – a graphical tool for working with MySQL databases.
    • JDBC Driver for MySQL (download MySQL Connector/J 5.1.25). Extract the zip archive and put the mysql-connector-java-VERSION-bin.jar file into classpath (in a same folder as your Java source files).

2. Creating a sample MySQL database

Let’s create a MySQL database called SampleDB with one table Users with the following structure:

Users table structures

Execute the following SQL script inside MySQL Workbench:

1
2
3
4
5
6
7
8
9
10
11
12
create database SampleDB;
 
use SampleDB;
 
CREATE TABLE `users` (
    `user_id` int(11) NOT NULL AUTO_INCREMENT,
    `username` varchar(45) NOT NULL,
    `password` varchar(45) NOT NULL,
    `fullname` varchar(45) NOT NULL,
    `email` varchar(45) NOT NULL,
    PRIMARY KEY (`user_id`)
);

Or if you are using MySQL Command Line Client program, save the above script into a file, let’s say, SQLScript.sqland execute the following command:

source Path\To\The\Script\File\SQLScript.sql

Here’s an example screenshot taken while executing the above script in MySQL Command Line Client program:

execute SQL script

3. Understand the main JDBC interfaces and classes

Let’s take an overview look at the JDBC’s main interfaces and classes with which we usually work. They are all available under the java.sql package:

    • DriverManager: this class is used to register driver for a specific database type (e.g. MySQL in this tutorial) and to establish a database connection with the server via its getConnection() method.
    • Connection: this interface represents an established database connection (session) from which we can create statements to execute queries and retrieve results, get metadata about the database, close connection, etc.
    • Statement and PreparedStatement: these interfaces are used to execute static SQL query and parameterized SQL query, respectively. Statement is the super interface of the PreparedStatement interface. Their commonly used methods are:
      • boolean execute(String sql): executes a general SQL statement. It returns true if the query returns a ResultSet, false if the query returns an update count or returns nothing. This method can be used with a Statement only.
      • int executeUpdate(String sql): executes an INSERT, UPDATE or DELETE statement and returns an update account indicating number of rows affected (e.g. 1 row inserted, or 2 rows updated, or 0 rows affected).
      • ResultSet executeQuery(String sql): executes a SELECT statement and returns a ResultSet object which contains results returned by the query.

A prepared statement is one that contains placeholders (in form question marks ?) for dynamic values will be set at runtime. For example:

SELECT * from Users WHERE user_id=?

Here the value of user_id is parameterized by a question mark and will be set by one of the setXXX() methods from the PreparedStatement interface, e.g. setInt(int index, int value).

    • ResultSet: contains table data returned by a SELECT query. Use this object to iterate over rows in the result set using next() method, and get value of a column in the current row using getXXX() methods (e.g. getString()getInt()getFloat() and so on). The column value can be retrieved either by index number (1-based) or by column name.
    • SQLException: this checked exception is declared to be thrown by all the above methods, so we have to catch this exception explicitly when calling the above classes’ methods. 

4. Connecting to the database

Supposing the MySQL database server is listening on the default port 3306 at localhost. The following code snippet connects to the database name SampleDB by the user root and password secret:

1
2
3
4
5
6
7
8
9
10
11
12
13
14
String dbURL = "jdbc:mysql://localhost:3306/sampledb";
String username = "root";
String password = "secret";
 
try {
 
    Connection conn = DriverManager.getConnection(dbURL, username, password);
 
    if (conn != null) {
        System.out.println("Connected");
    }
catch (SQLException ex) {
    ex.printStackTrace();
}

Once the connection was established, we have a Connection object which can be used to create statements in order to execute SQL queries. In the above code, we have to close the connection explicitly after finish working with the database:

1
conn.close();

However, since Java 7, we can take advantage of the try-with-resources statement which will close the connection automatically, as shown in the following code snippet:

1
2
3
4
5
6
7
try (Connection conn = DriverManager.getConnection(dbURL, username, password)) {
    
    // code to execute SQL queries goes here...
    
catch (SQLException ex) {
    ex.printStackTrace();
}

If you are using Java 7 or later, this approach is recommended. The sample programs in this tutorial are all using this try-with-resources statement to make a database connection.

NOTE: For details about connecting to a MySQL database, see the article: Connect to MySQL database via JDBC.

5. JDBC Execute INSERT Statement Example

Let’s write code to insert a new record into the table Users with following details:

    • username: bill
    • password: secretpass
    • fullname: Bill Gates
    • email: bill.gates@microsoft.com

Here’s the code snippet:

1
2
3
4
5
6
7
8
9
10
11
12
String sql = "INSERT INTO Users (username, password, fullname, email) VALUES (?, ?, ?, ?)";
 
PreparedStatement statement = conn.prepareStatement(sql);
statement.setString(1"bill");
statement.setString(2"secretpass");
statement.setString(3"Bill Gates");
statement.setString(4"bill.gates@microsoft.com");
 
int rowsInserted = statement.executeUpdate();
if (rowsInserted > 0) {
    System.out.println("A new user was inserted successfully!");
}

In this code, we create a parameterized SQL INSERT statement and create a PreparedStatement from the Connection object. To set values for the parameters in the INSERT statement, we use the PreparedStatement‘s setString() methods because all these columns in the table Users are of type VARCHAR which is translated to String type in Java. Note that the parameter index is 1-based (unlike 0-based index in Java array).

The PreparedStatement interface provides various setXXX() methods corresponding to each data type, for example:

    • setBoolean(int parameterIndex, boolean x)
    • setDate(int parameterIndex, Date x)
    • setFloat(int parameterIndex, float x)

And so on. Which method to be used is depending on the type of the corresponding column in the database table.

Finally we call the PreparedStatement’s executeUpdate() method to execute the INSERT statement. This method returns an update count indicating how many rows in the table were affected by the query, so checking this return value is necessary to ensure the query was executed successfully. In this case, executeUpdate() method should return 1 to indicate one record was inserted.

6. JDBC Execute SELECT Statement Example

The following code snippet queries all records from the Users table and print out details for each record:

1
2
3
4
5
6
7
8
9
10
11
12
13
14
15
16
String sql = "SELECT * FROM Users";
 
Statement statement = conn.createStatement();
ResultSet result = statement.executeQuery(sql);
 
int count = 0;
 
while (result.next()){
    String name = result.getString(2);
    String pass = result.getString(3);
    String fullname = result.getString("fullname");
    String email = result.getString("email");
 
    String output = "User #%d: %s - %s - %s - %s";
    System.out.println(String.format(output, ++count, name, pass, fullname, email));
}

Output:

User #1: bill – secretpass – Bill Gates – bill.gates@microsoft.com

Because the SQL SELECT query here is static so we just create a Statement object from the connection. The while loop iterates over the rows contained in the result set by repeatedly checking return value of the ResultSet’s next() method. The next() method moves a cursor forward in the result set to check if there is any remaining record. For each iteration, the result set contains data for the current row, and we use the ResultSet’s getXXX(column index/column name) method to retrieve value of a specific column in the current row, for example this statement:

1
String name = result.getString(2);

Retrieves value of the second column in the current row, which is the username field. The value is casted to a String because we know that the username field is of type VARCHAR based on the database schema mentioned previously. Keep in mind that the column index here is 1-based, the first column will be at index 1, the second at index 2, and so on. If you are not sure or don’t know exactly the index of column, so passing a column name would be useful:

1
String fullname = result.getString("fullname");

For other data types, the ResultSet provide appropriate getter methods:

    • getString()
    • getInt()
    • getFloat()
    • getDate()
    • getTimestamp()

TIPS: Accessing column’s value by column index would provide faster performance then column name.

7. JDBC Executing UPDATE Statement Example

The following code snippet will update the record of “Bill Gates” as we inserted previously:

1
2
3
4
5
6
7
8
9
10
11
12
String sql = "UPDATE Users SET password=?, fullname=?, email=? WHERE username=?";
 
PreparedStatement statement = conn.prepareStatement(sql);
statement.setString(1"123456789");
statement.setString(2"William Henry Bill Gates");
statement.setString(3"bill.gates@microsoft.com");
statement.setString(4"bill");
 
int rowsUpdated = statement.executeUpdate();
if (rowsUpdated > 0) {
    System.out.println("An existing user was updated successfully!");
}

This code looks very similar to the INSERT code above, except the query type is UPDATE.

8. JDBC Execute DELETE Statement Example

The following code snippet will delete a record whose username field contains “bill”:

1
2
3
4
5
6
7
8
9
String sql = "DELETE FROM Users WHERE username=?";
 
PreparedStatement statement = conn.prepareStatement(sql);
statement.setString(1"bill");
 
int rowsDeleted = statement.executeUpdate();
if (rowsDeleted > 0) {
    System.out.println("A user was deleted successfully!");
}

So far we have one through some examples demonstrating how to use JDBC API to execute SQL INSERT, SELECT, UPDATE and DELETE statements. The key points to remember are:

    • Using a Statement for a static SQL query.
    • Using a PreparedStatement for a parameterized SQL query and using setXXX() methods to set values for the parameters.
    • Using execute() method to execute general query.
    • Using executeUpdate() method to execute INSERT, UPDATE or DELETE query
    • Using executeQuery() method to execute SELECT query.
    • Using a ResultSet to iterate over rows returned from a SELECT query, using its next() method to advance to next row in the result set, and using getXXX() methods to retrieve values of columns.

Handling ResultSet

Java ResultSet interface is a part of the java.sql package. It is one of the core components of the JDBC Framework. ResultSet Object is used to access query results retrieved from the relational databases.

ResultSet maintains cursor/pointer which points to a single row of the query results. Using navigational and getter methods provided by ResultSet, we can iterate and access database records one by one. ResultSet can also be used to update data.

Java ResultSet Hierarchy

Java ResultSet Class Hierarchy

The above diagram shows the place of ResultSet in the JDBC Framework. ResultSet can be obtained by executing SQL Query using StatementPreparedStatement or CallableStatement.

AutoCloseableWrapper are super interfaces of ResultSet.  Now we will see how to work with ResultSet in our Java programs.

ResultSet Example

We will be using MySQL for our example purpose. Use below DB script to create a database and table along with some records.

 
create database empdb;

use empdb;

create table tblemployee (empid integer primary key, firstname varchar(32), lastname varchar(32), dob date);

insert into tblemployee values  (1, 'Mike', 'Davis',' 1998-11-11');
insert into tblemployee values  (2, 'Josh', 'Martin', '1988-10-22');
insert into tblemployee values  (3, 'Ricky', 'Smith', '1999-05-11');
 

Let’s have look at the below example program to fetch the records from the table and print them on the console. Please make sure you have the MySQL JDBC driver in the project classpath.

 
package com.journaldev.examples;

import java.sql.Connection;
import java.sql.DriverManager;
import java.sql.ResultSet;
import java.sql.Statement;
import java.util.Date;

/**
 * Java Resultset Example of Retrieving records.
 * 
 * @author pankaj
 *
 */

public class ResultSetDemo {

	public static void main(String[] args) {
		String query = "select empid, firstname, lastname, dob from tblemployee";
		Connection conn = null;
		Statement stmt = null;
		try {
			Class.forName("com.mysql.jdbc.Driver");
			conn = DriverManager.getConnection("jdbc:mysql://127.0.0.1:3306/empdb", "root", "root");
			stmt = conn.createStatement();
			ResultSet rs = stmt.executeQuery(query);
			while (rs.next()) {
				Integer empId = rs.getInt(1);
				String firstName = rs.getString(2);
				String lastName = rs.getString(3);
				Date dob = rs.getDate(4);
				System.out.println("empId:" + empId);
				System.out.println("firstName:" + firstName);
				System.out.println("lastName:" + lastName);
				System.out.println("dob:" + dob);
				System.out.println("");
			}
			rs.close();
		} catch (Exception e) {
			e.printStackTrace();
		} finally {
			try {
				stmt.close();
				conn.close();
			} catch (Exception e) {}
		}
	}
}

Output:

empId:1
firstName:Mike
lastName:Davis
dob:1998-11-11

empId:2
firstName:Josh
lastName:Martin
dob:1988-10-22

empId:3
firstName:Ricky
lastName:Smith
dob:1999-05-11

Explanation:

  • ResultSet is obtained by calling the executeQuery method on Statement instance. Initially, the cursor of ResultSet points to the position before the first row.
  • The method next of ResultSet moves the cursor to the next row. It returns true if there is further row otherwise it returns false.
  • We can obtain data from ResultSet using getter methods provided by it. e.g.  getInt(),  getString(),  getDate()
  • All the getter methods have two variants. 1st variant takes column index as Parameter and 2nd variant accepts column name as Parameter.
  • Finally, we need to call close method on ResultSet instance so that all resources are cleaned up properly.

ResultSet Types & Concurrency

We can specify type and concurrency of  ResultSet while creating an instance of Statement, PreparedStatement or CallableStatement.

statement.createStatement(int resultSetType, int resultSetConcurrency)

ResultSet Types

1) Forward Only (ResultSet.TYPE_FORWARD_ONLY)

This type of ResultSet instance can move only in the forward direction from the first row to the last row. ResultSet can be moved forward one row by calling the next() method. We can obtain this type of ResultSet while creating Instance of Statement, PreparedStatement or CallableStatement.

 
Statement stmt = connection.createStatement(ResultSet.TYPE_FORWARD_ONLY, ResultSet.CONCUR_READ_ONLY);
ResultSet rs = stmt.executeQuery("select * from tbluser");
 

2) Scroll Insensitive (ResultSet.TYPE_SCROLL_INSENSITIVE)

Scroll Insensitive ResultSet can scroll in both forward and backward directions. It can also be scrolled to an absolute position by calling the absolute() method. But it is not sensitive to data changes. It will only have data when the query was executed and ResultSet was obtained. It will not reflect the changes made to data after it was obtained.

 
Statement stmt = connection.createStatement(ResultSet.TYPE_SCROLL_INSENSITIVE,  		ResultSet.CONCUR_READ_ONLY);
ResultSet rs = stmt.executeQuery("select * from tbluser");

3) Scroll Sensitive (ResultSet.TYPE_SCROLL_SENSITIVE)

Scroll Sensitive ResultSet can scroll in both forward and backward directions. It can also be scrolled to an absolute position by calling the absolute() method. But it is sensitive to data changes. It will reflect the changes made to data while it is open.

 
Statement stmt = connection.createStatement(ResultSet.TYPE_SCROLL_SENSITIVE,  		ResultSet.CONCUR_READ_ONLY);
ResultSet rs = stmt.executeQuery("select * from tbluser");

ResultSet Concurrency

1) Read Only (ResultSet.CONCUR_READ_ONLY)

It is the default concurrency model.  We can only perform Read-Only operations on ResultSet Instance. No update Operations are allowed.

2) Updatable (ResultSet.CONCUR_UPDATABLE)

In this case, we can perform update operations on ResultSet instance.

ResultSet Methods

We can divide ResultSet methods into the following categories.

  • Navigational Methods
  • Getter/Reader Methods
  • Setter/Updater Methods
  • Miscellaneous Methods – close() and getMetaData()

1. ResultSet Navigational Methods

  • boolean absolute(int row) throws SQLException**:** This method moves ResultSet cursor to the specified row and returns true if the operation is successful.
  • void afterLast() throws SQLException**:** This method moves ResultSet cursor to the position after the last row.
  • void beforeFirst() throws SQLException**:** This method moves ResultSet cursor to the position before the first row.
  • boolean first() throws SQLException: This method moves ResultSet cursor to the first row.
  • boolean last() throws SQLException: This method moves ResultSet cursor to the last row.
  • boolean next() throws SQLException: This method moves ResultSet cursor to the next row.
  • boolean previous() throws SQLException: This method moves ResultSet cursor to the previous row.
 
package com.journaldev.examples;
import java.sql.*;

/**
 * Java Resultset Example using navigational methods.
 * 
 * @author pankaj
 *
 */
public class ResultSetDemo {

	public static void main(String[] args) {
		String query = "select empid, firstname, lastname, dob from tblemployee";
		Connection conn = null;
		Statement stmt = null;
		try {
			Class.forName("com.mysql.jdbc.Driver");
			conn = DriverManager.getConnection("jdbc:mysql://127.0.0.1:3306/empdb", "root", "root");
			stmt = conn.createStatement(ResultSet.TYPE_SCROLL_INSENSITIVE, ResultSet.CONCUR_READ_ONLY);
			ResultSet rs = stmt.executeQuery(query);
			System.out.println("All the rows of table=>");
			while (rs.next()) { 
				// Go to next row by calling next() method
				displayData(rs);
			}
			System.out.println("Now go directly to 2nd row=>");
			rs.absolute(2); // Go directly to 2nd row
			displayData(rs);
			System.out.println("Now go to Previous row=>");
			rs.previous(); 
			// Go to 1st row which is previous of 2nd row
			displayData(rs);
			rs.close();
		} catch (Exception e) {
			e.printStackTrace();
		} finally {
			try {
				stmt.close();
				conn.close();
			} catch (Exception e) {
			}
		}
	}

	public static void displayData(ResultSet rs) throws SQLException {
		System.out.println("empId:" + rs.getInt(1));
		System.out.println("firstName:" + rs.getString(2));
		System.out.println("lastName:" + rs.getString(3));
		System.out.println("dob:" + rs.getDate(4));
		System.out.println("");
	}
}

Output:

All the rows of table=>
empId:1
firstName:Mike
lastName:Davis
dob:1998-11-11

empId:2
firstName:Josh
lastName:Martin
dob:1988-10-22

empId:3
firstName:Ricky
lastName:Smith
dob:1999-05-11

Now go directly to 2nd row=>
empId:2
firstName:Josh
lastName:Martin
dob:1988-10-22

Now go to Previous row=>
empId:1
firstName:Mike
lastName:Davis
dob:1998-11-11

2. ResultSet Getter/Reader Methods

  • int getInt(int columnIndex) throws SQLException: This method returns value of specified columnIndex as int.
  • long getLong(int columnIndex) throws SQLException: This method returns value of specified columnIndex as long
  • String getString(int columnIndex) throws SQLException: This method returns value of specified columnIndex as String
  • java.sql.Date getDate(int columnIndex) throws SQLException: This method returns value of specified columnIndex as java.sql.Date
  • int getInt(String columnLabel) throws SQLException: This method returns value of specified column name as int.
  • long getLong(String columnLabel) throws SQLException: This method returns value of specified column name as long.
  • String getString(String columnLabel) throws SQLException: This method returns the value of the specified column name as String.
  • java.sql.Date getDate(String columnLabel) throws SQLException: This method returns the value of the specified column name as java.sql.Date.
  • ResultSet contains getter methods that return other primitive datatypes like boolean, float and double. It also has methods to obtain array and binary data from the database.

3. ResultSet Setter/Updater Methods

  • void updateInt(int columnIndex, int x) throws SQLException: This method updates the value of specified column of current row with int value.
  • void updateLong(int columnIndex, long x) throws SQLException: This method updates the value of the specified column of the current row with long value.
  • void updateString(int columnIndex, String x) throws SQLException: This method updates the value of the specified column of the current row with a String value.
  • void updateDate(int columnIndex, java.sql.Date x) throws SQLException: This method updates the value of specified column of current row with java.sql.Date value.
  • void updateInt(String columnLabel, int x) throws SQLException: This method updates the value of the specified column label of the current row with int value.
  • void updateLong(String columnLabel, long x) throws SQLException: This method updates the value of the specified column label of the current row with long value.
  • void updateString(String columnLabel, String x) throws SQLException: This method updates the value of the specified column label of the current row with a String value.
  • void updateDate(String columnLabel, java.sql.Date x) throws SQLException: This method updates the value of specified columnLabel of current row with java.sql.Date value.

Note: Setter/Updater Methods doesn’t directly update database values. Database values will be inserted/updated after calling the insertRow or updateRow method.

 
package com.journaldev.examples;
import java.sql.*;

/**
 * Java Resultset Example using updater methods.
 * 
 * @author pankaj
 *
 */

public class ResultSetUpdateDemo {

	public static void main(String[] args) {
		String query = "select empid, firstname, lastname, dob from tblemployee";
		Connection conn = null;
		Statement stmt = null;
		try {
			Class.forName("com.mysql.jdbc.Driver");
			conn = DriverManager.getConnection("jdbc:mysql://127.0.0.1:3306/empdb", "root", "root");
			stmt = conn.createStatement(ResultSet.TYPE_SCROLL_INSENSITIVE, ResultSet.CONCUR_UPDATABLE);
			ResultSet rs = stmt.executeQuery(query);
			System.out.println("Now go directly to 2nd row for Update");
			if (rs.absolute(2)) { 
				// Go directly to 2nd row
				System.out.println("Existing Name:" + rs.getString("firstName"));
				rs.updateString("firstname", "Tyson");
				rs.updateRow();
			}
			rs.beforeFirst(); // go to start
			System.out.println("All the rows of table=>");
			while (rs.next()) { 
			// Go to next row by calling next() method
				displayData(rs);
			}
			rs.close();
		} catch (Exception e) {
			e.printStackTrace();
		} finally {
			try {
				stmt.close();
				conn.close();
			} catch (Exception e) {
			}
		}
	}

	public static void displayData(ResultSet rs) throws SQLException {
		System.out.println("empId:" + rs.getInt(1));
		System.out.println("firstName:" + rs.getString(2));
		System.out.println("lastName:" + rs.getString(3));
		System.out.println("dob:" + rs.getDate(4));
		System.out.println("");
	}
}

Output:

Now go directly to 2nd row for Update
Existing Name:Josh
All the rows of table=>
empId:1
firstName:Mike
lastName:Davis
dob:1998-11-11

empId:2
firstName:Tyson
lastName:Martin
dob:1988-10-22

empId:3
firstName:Ricky
lastName:Smith
dob:1999-05-11

4. ResultSet Miscellaneous Methods

  • void close() throws SQLException**:** This method frees up resources associated with ResultSet Instance. It must be called otherwise it will result in resource leakage.
  • ResultSetMetaData getMetaData() throws SQLException: This method returns ResultSetMetaData instance. It gives information about the type and property of columns of the query output.

Jackson and Gson for JSON handling

JSON (JavaScript Object Notation) is the standard format for exchanging data in modern web applications. Java provides powerful libraries like Gson and Jackson to handle JSON processing, making it easier to parse, generate, and manipulate JSON data.

This guide will explore how to use Gson and Jackson to work with JSON in Java, providing examples and best practices along the way.

1. Why JSON is Important

  • Lightweight and Human-Readable: JSON is easy to understand and less verbose compared to XML.
  • Cross-Platform: JSON is language-agnostic, making it ideal for APIs and data exchange.
  • Flexible: Supports various data types, including objects, arrays, and primitive values.

2. Libraries for JSON Processing in Java

2.1. Gson

A lightweight library by Google, Gson makes it easy to serialize Java objects to JSON and vice versa.

Add Gson Dependency (Maven):

<dependency>
<groupId>com.google.code.gson</groupId>
<artifactId>gson</artifactId>
<version>2.8.9</version>
</dependency>

2.2. Jackson

Jackson is a robust library widely used for JSON processing in Java. It provides extensive customization options.

Add Jackson Dependency (Maven):

<dependency>
<groupId>com.fasterxml.jackson.core</groupId>
<artifactId>jackson-databind</artifactId>
<version>2.15.0</version>
</dependency>

3. Parsing JSON with Gson

3.1. Deserialize JSON to Java Object

import com.google.gson.Gson;

class Employee {
private String name;
private int age;

// Getters and Setters
}

public class GsonExample {
public static void main(String[] args) {
String json = "{\"name\": \"Alice\", \"age\": 30}";

Gson gson = new Gson();
Employee employee = gson.fromJson(json, Employee.class);

System.out.println("Name: " + employee.getName());
System.out.println("Age: " + employee.getAge());
}
}
 

Dynamic Class and Method Invocation

Java Reflection API provides us information about a Class to which the Object belongs to including the methods in this class. Using these Reflection API we would be able to get invoking pointer for a method in a class with its name.

There are two functions used for this purpose:

  1. Invoking method with its name
  2. Finding a method by Name in a class and invoking the same

1. Invoking method with its name

getDeclaredMethod() is used for this purpose

Syntax

Class.getDeclaredMethod(“method name”, parameterType)

Method name: the method we want to find by name 

Parameter Type: Type of parameters the method accepts

Return Type: This method would return an object with reference to the method’s address which would then be used to invoke the method. We would use invoke method for this

If there are many overloaded methods with the same name, the compiler would invoke the method matching the parameter

Invoke function

Would be used to invoke the method using the Method object

Syntax

Method.invoke(classObj, param1, param2…)

methodObj: Object of method returned from the getDeclaredMethod  

Parameters: parameter values used to invoke the method. If the method does not have any parameters to be passed, then we would pass null here

Example

 
// Java program to invoke method with its name
// using Reflection API
  
import java.io.*;
import java.lang.reflect.InvocationTargetException;
import java.lang.reflect.Method;
import java.lang.reflect.Type;
  
class GFG {
    public void printMessage(String message)
    {
        System.out.println(
            "you invoked me with the message:" + message);
    }
    
    public static void main(String[] args) throws Exception
    {
        System.out.println("Invoke method by Name in Java using Reflection!");
        
        // create class object to get its details
        GFG obj = new GFG();
        
        Class<?> classObj = obj.getClass();
  
        // get method object for "printMessage" function by
        // name
        Method printMessage = classObj.getDeclaredMethod("printMessage", String.class);
  
        try {
            
            // invoke the function using this class obj
            // pass in the class object
            printMessage.invoke(obj, "hello"); 
        }
        
        catch (InvocationTargetException e) 
        {
            System.out.println(e.getCause());
        }
    }
}
Output
Invoke method by Name in Java using Reflection!
you invoked me with the message:hello

2. Finding a method by Name in a class and invoking the same

In case we don’t know the exact method parameters, we could also get all the methods in the class and search through the method by its name and then get details of it  

  • We would use getDeclaredMethods() API for the same. This would return array of Method objects in the class
  • We can use this to loop through the Method objects and find the method by its name using the getName().
  • Then we would use the getGenericParameterTypes() to find the parameter it takes and getGenericReturnType() to find its return type
  • Once we have the parameter and return type, we would use our invoke function mentioned above to invoke the method

Syntax

Method[] methods = Class.getDeclaredMethods()  

Example:

 
// Java program of Finding a method by Name in a class
// and invoking the same
  
import java.io.*;
import java.lang.reflect.InvocationTargetException;
import java.lang.reflect.Method;
import java.lang.reflect.Type;
  
class GeeksForGeeks {
    public void printMessage(String message)
    {
        System.out.println(
            "you invoked me with the message:" + message);
    }
  
    public void addMe(int num1, int num2)
    {
        System.out.println("sum is:" + (num1 + num2));
    }
  
    public static void main(String[] args) throws Exception
    {
        System.out.println("Find method by Name in Java using Reflection!");
        
        // create class object to get its details
        GeeksForGeeks obj = new GeeksForGeeks();
        
        Class classObj = obj.getClass();
  
        // get all methods in the class
        Method[] allMethods = classObj.getDeclaredMethods();
  
        // loop through the methods to find the method addMe
        for (Method m : allMethods) {
            
            String methodName = m.getName();
            if (methodName.equals("addMe")) {
                try {
                    
                    // invoke the method directly with its
                    // parameters
                    m.invoke(obj, 10, 20);
                }
                catch (InvocationTargetException e) {
                }
            }
        }
    }
}
Output
Find method by Name in Java using Reflection!
sum is:30

Exception thrown by invoke method

Invoke method would throw InvocationTargetException when the underlying method being invoked throws an exception. We would be able to retrieve the method’s exception by using getCause() method of InvocationTargetException

Use Cases in Automation (e.g., invoking test methods dynamically)

Dynamic testing is a type of software testing that involves executing the software and evaluating its behavior during runtime. It is also known as functional testing, as it focuses on testing the software’s functionality and how it behaves under different inputs and conditions. In this article, we’ll learn about its objectives, levels, processes, advantages, and disadvantages.

What is Dynamic Testing?

Dynamic Testing is a type of Software Testing that is performed to analyze the dynamic behavior of the code. It includes the testing of the software for the input values and output values that are analyzed. It is performed to describe the dynamic behavior of code. It refers to the observation of the physical response from the system to variables that are not constant and change with time.

Objectives of Dynamic Testing

  1. Find errors and bugs: Through comprehensive testing, find and expose flaws, faults, or defects in the software code and its functionality so that they can be fixed as soon as possible.
  2. Verify the behavior of the system: Verify that the software operates as expected and complies with company requirements, industry or regulatory standards, user expectations, and any applicable business regulations.
  3. Assessing Performance: To make sure the software satisfies performance requirements, evaluate its performance by monitoring reaction times, throughput, and use of resources under various scenarios.
  4. Assure Trustworthiness: Examine the software’s dependability by determining how well it performs regularly under typical operating conditions, free of unexpected faults or crashes.
  5. Accuracy of Test Data: Verify the precision and consistency of the data handled by the software to guarantee reliable and uniform information handling.
  6. Assess Scalability: Examine whether the application can grow to handle more users, workloads, or data volumes without seeing an obvious decline in performance.

Levels of Dynamic Testing

Several levels of dynamic testing are commonly used in the software development process, including:

  1. Unit testing: Unit testing is the process of testing individual software components or “units” of code to ensure that they are working as intended. Unit tests are typically small and focus on testing a specific feature or behavior of the software.
  2. Integration testing: Integration testing is the process of testing how different components of the software work together. This level of testing typically involves testing the interactions between different units of code, and how they function when integrated into the overall system.
  3. System testing: System testing is the process of testing the entire software system to ensure that it meets the specified requirements and is working as intended. This level of testing typically involves testing the software’s functionality, performance, and usability.
  4. Acceptance testing: Acceptance testing is the final stage of dynamic testing, which is done to ensure that the software meets the needs of the end-users and is ready for release. This level of testing typically involves testing the software’s functionality and usability from the perspective of the end-user.
  5. Performance testing: Performance testing is a type of dynamic testing that is focused on evaluating the performance of a software system under a specific workload. This can include testing how the system behaves under heavy loads, how it handles a large number of users, and how it responds to different inputs and conditions.
  6. Security testing: Security testing is a type of dynamic testing that is focused on identifying and evaluating the security risks associated with a software system. This can include testing how the system responds to different types of security threats, such as hacking attempts, and evaluating the effectiveness of the system’s security features.
    Levels of dynamic testing 

Dynamic Testing Process Phase

  1. Test Case Design: It defines the test objectives, scope and criteria. It defines test data and expected outcomes and develops test cases based on requirements and specifications. It generates test cases that address various programmes features.
  2. Test Environment Setup: It sets up the settings and infrastructure required for testing. It configured the network, hardware and software in the test environment. Additionally, it makes sure that the test environment matches the production environment by installing and configuring the required test tools and test harnesses.
  3. Test Case Execution: Using the specified test data, it runs the test cases in order to verify the software’s behavior. It keeps track of and logs the actual outcomes, comparing them with the predicted results to find any differences. It runs test scenarios in both positive and negative modes.
  4. Test Analysis: It evaluates the general behavior of the system and finds faults by analyzing the test case outcomes. Any inconsistencies or flaws discovered during test execution are documented and reported. It works along with development teams to figure out and address concerns that are reported.

Advantages of Dynamic Testing

  1. Disclosure of Difficult and Complex Defects: It discloses very difficult and complex defects.
  2. Improvement in Software Quality: It increases the quality of the software product or application being tested.
  3. Security Threat Detection: Dynamic testing detects security threats and ensure the better secure application.
  4. Early-Stage Functionality Testing: It can be used to test the functionality of the software at the early stages of development.
  5. Ease of Implementation: It is easy to implement and does not require any special tools or expertise.
  6. Testing with Different Inputs, Data Sets, and User Profiles: It can be used to test the software with different input values, data sets and user profiles.
  7. Functionality and Performance Testing: It can be used to test the functionality of the code and performance of the code.

Disadvantages of Dynamic Testing

  1. Time-Consuming Process: It is a time consuming process as in dynamic testing whole code is executed.
  2. Increased Budget: It increases the budget of the software as dynamic testing is costly.
  3. Resource Intensive: Dynamic testing may require more resources than static testing.
  4. Less Effective in Some Cases: Dynamic testing may be less effective than static testing in some cases.
  5. Incomplete Test Scenario Coverage: It is difficult to cover all the test scenarios.
  6. Difficulty in Root Cause Analysis: It is difficult to find out the root cause of the defects.

IMPORTANTS POINTS:

Some important points to keep in mind when performing dynamic testing include:

  1. Defining clear and comprehensive test cases: It is important to have a clear set of test cases that cover a wide range of inputs and use cases. This will help to ensure that the software is thoroughly tested and any issues are identified and addressed.
  2. Automation: Automated testing tools can be used to quickly and efficiently execute test cases, making it easier to identify and fix any issues that are found.
  3. Performance testing: It’s important to evaluate the software’s performance under different loads and conditions to ensure that it can handle the expected usage and the expected number of users.
  4. Security testing: It is important to identify and evaluate the security risks associated with a software system, and to ensure that the system is able to withstand different types of security threats.
  5. Defect tracking: A defect tracking system should be implemented to keep track of any issues that are identified during dynamic testing, and to ensure that they are addressed and resolved in a timely manner.
  6. Regular testing: It’s important to regularly perform dynamic testing throughout the software development process, to ensure that any issues are identified and addressed as soon as they arise.
  7. Test-Driven Development: It’s important to design and implement test cases before the actual development starts, this approach ensures that the software meets the requirements and is thoroughly tested.